
Quick answer: If your site runs through Cloudflare and doesn’t use consent mode, open Google Tag Manager, go to Admin > Google tag gateway, scan your site, pick Cloudflare, confirm an unused measurement path such as /metrics, sign in to Cloudflare, choose your domains and select Complete setup. It’s free on any Cloudflare plan and needs no code changes. If you do use consent mode, set it up manually with a Cloudflare Snippet (Pro plan or higher) and retag your pages so consent defaults load first.
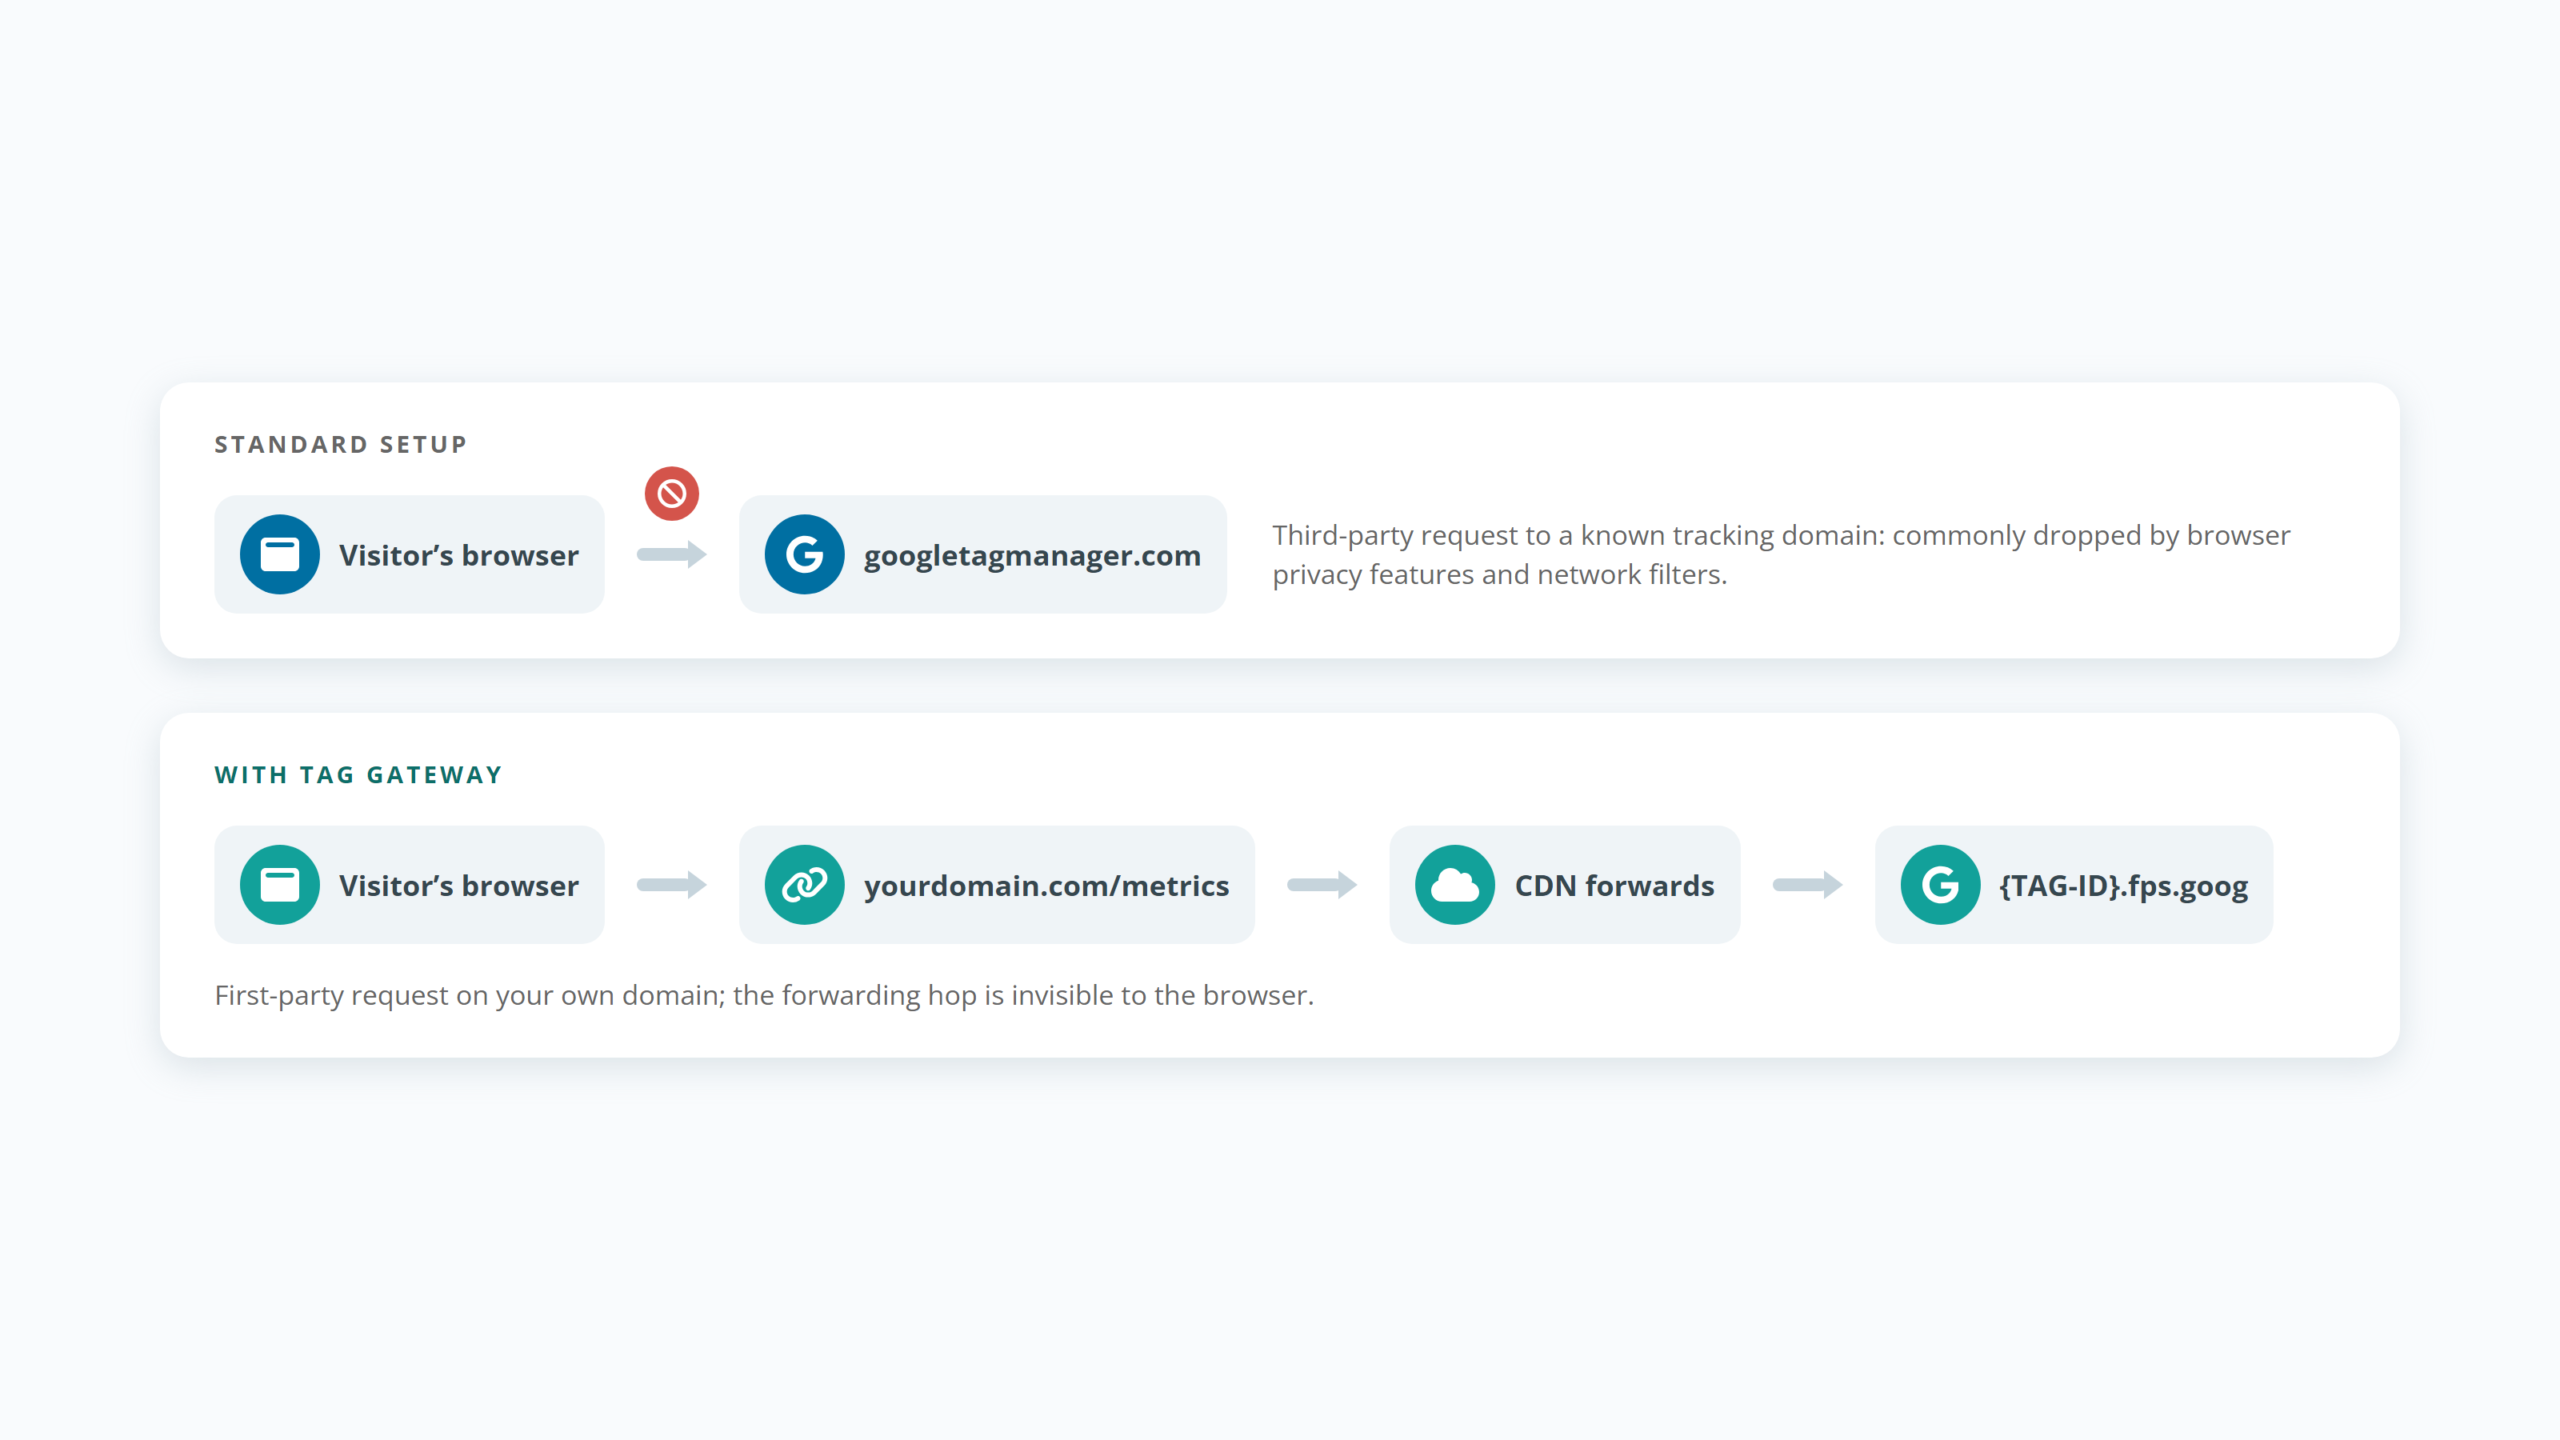
Google Tag Gateway (officially, Google tag gateway for advertisers) serves your Google tags from your own domain instead of googletagmanager.com. If your site already runs through Cloudflare, it is the easiest place to set it up: the automated route takes minutes and costs nothing. Setups usually go wrong in four places: the consent-mode rule, the path you choose, the Tag Manager snippet, and proving that it actually works.
This guide covers the whole job, from the checks before you start to the rollback if you ever need one. If you are still deciding whether Tag Gateway is worth it for your site, start with our explainer, Google Tag Gateway, Explained, then come back here.
What you will have at the end: your Tag Manager container (or Google tag) loading from yourdomain.com/your-path/, Google measurement hits routed through that path, an Active status in Google’s settings, and a baseline to measure the effect against.
How does Google Tag Gateway work on Cloudflare?
You reserve one unused path on your domain, for example /metrics/. Cloudflare catches every request to that path and forwards it to Google’s gateway endpoint on fps.goog. On the way, it adds the visitor’s approximate location so your geographic reports stay intact. The browser only ever talks to your own domain.
What do you need before you start?
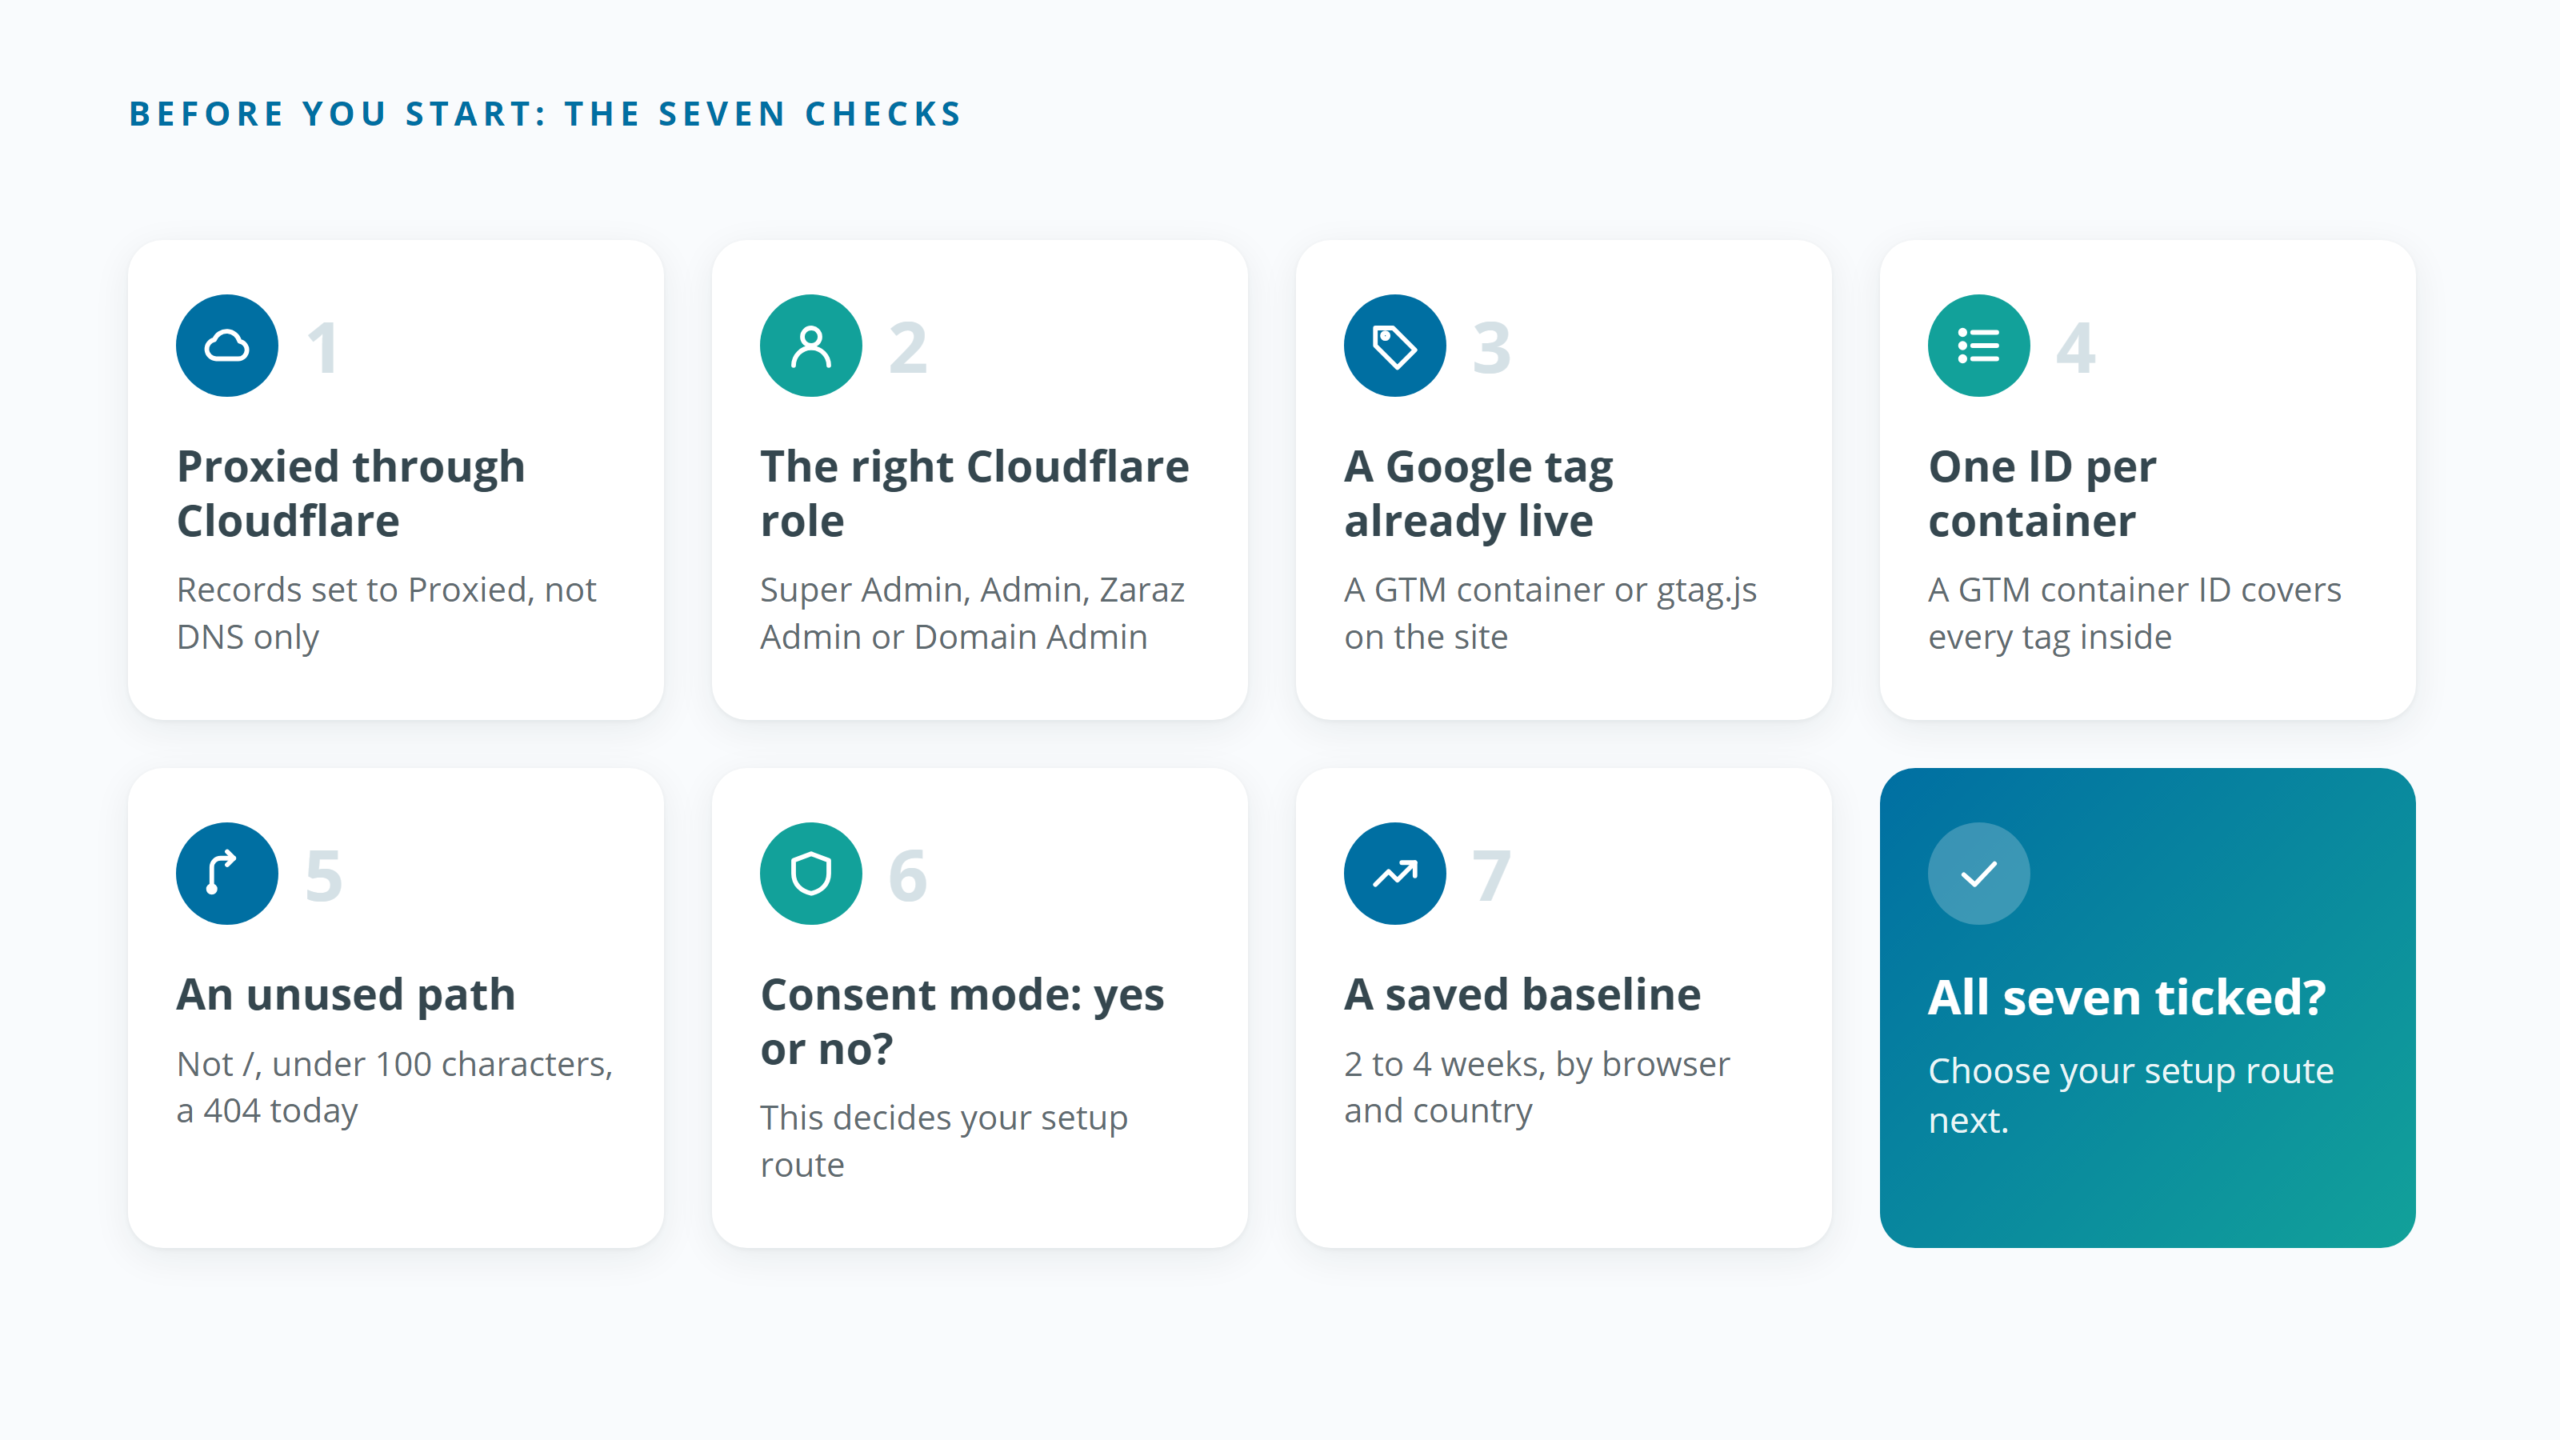
- Your site runs through Cloudflare as its CDN. The gateway works on traffic that passes through Cloudflare. DNS records set to “DNS only” (grey cloud) send visitors straight to your server, so Cloudflare never sees the measurement path.
- You have the right Cloudflare role. At account level that means Super Administrator, Administrator or Zaraz Admin. With domain-scoped roles, it means Domain Administrator.
- A Google tag or Tag Manager container is already live. The gateway upgrades an existing setup. It does not create your tracking.
- You know which ID you are routing. If everything runs through Google Tag Manager (GTM), you route the container ID (
GTM-XXXXXXX) once, and every tag inside it is covered: GA4, Google Ads and Floodlight alike. There is no need to repeat the setup for tags inside that container. Each additional container, and each standalone gtag.js tag outside GTM (a Google Ads tag added by a plugin, for example), needs its own setup and its own path. - You have picked a measurement path. Google’s rules: it must not already be used on your domain, it cannot be the root
/, and it cannot exceed 100 characters. A readable word (/metrics,/analytics,/gtm) works, and Google notes that a random string of letters and numbers lowers the chance of a collision. Before you commit, openhttps://yourdomain.com/your-path/in a browser and confirm you get your 404 page. Every request under that path will be rerouted to Google, so anything that lived there will break. - You know whether your site uses consent mode. If a cookie banner or consent platform sends consent signals to Google, that decides your route (next section). Google’s rule is explicit: if you use consent mode, you must turn off automated script setup.
- You have recorded a baseline. Note the go-live date and export two to four weeks of sessions, users and conversions, split by browser and country. Without it, you cannot show what the gateway recovered.
Which setup route should you use?
| Route A: automated, from Google | Route B: Cloudflare dashboard | Route C: manual, Cloudflare Snippets | |
|---|---|---|---|
| Where you start | GTM, GA4 or Google Ads | Cloudflare dashboard | Cloudflare dashboard (Rules > Snippets) |
| Cloudflare plan | Any plan | Any plan | Pro or higher |
| Retag your pages | No | No | Yes, every page |
| Control over script order | No | No | Full |
| Sites with consent mode | Not allowed (Google: turn off automated script setup) | Not recommended (Cloudflare rewrites the tag for you) | Yes |
| Best for | Most sites without consent mode | Teams who manage Cloudflare but not GTM | Consent-mode sites, and teams that want full control |
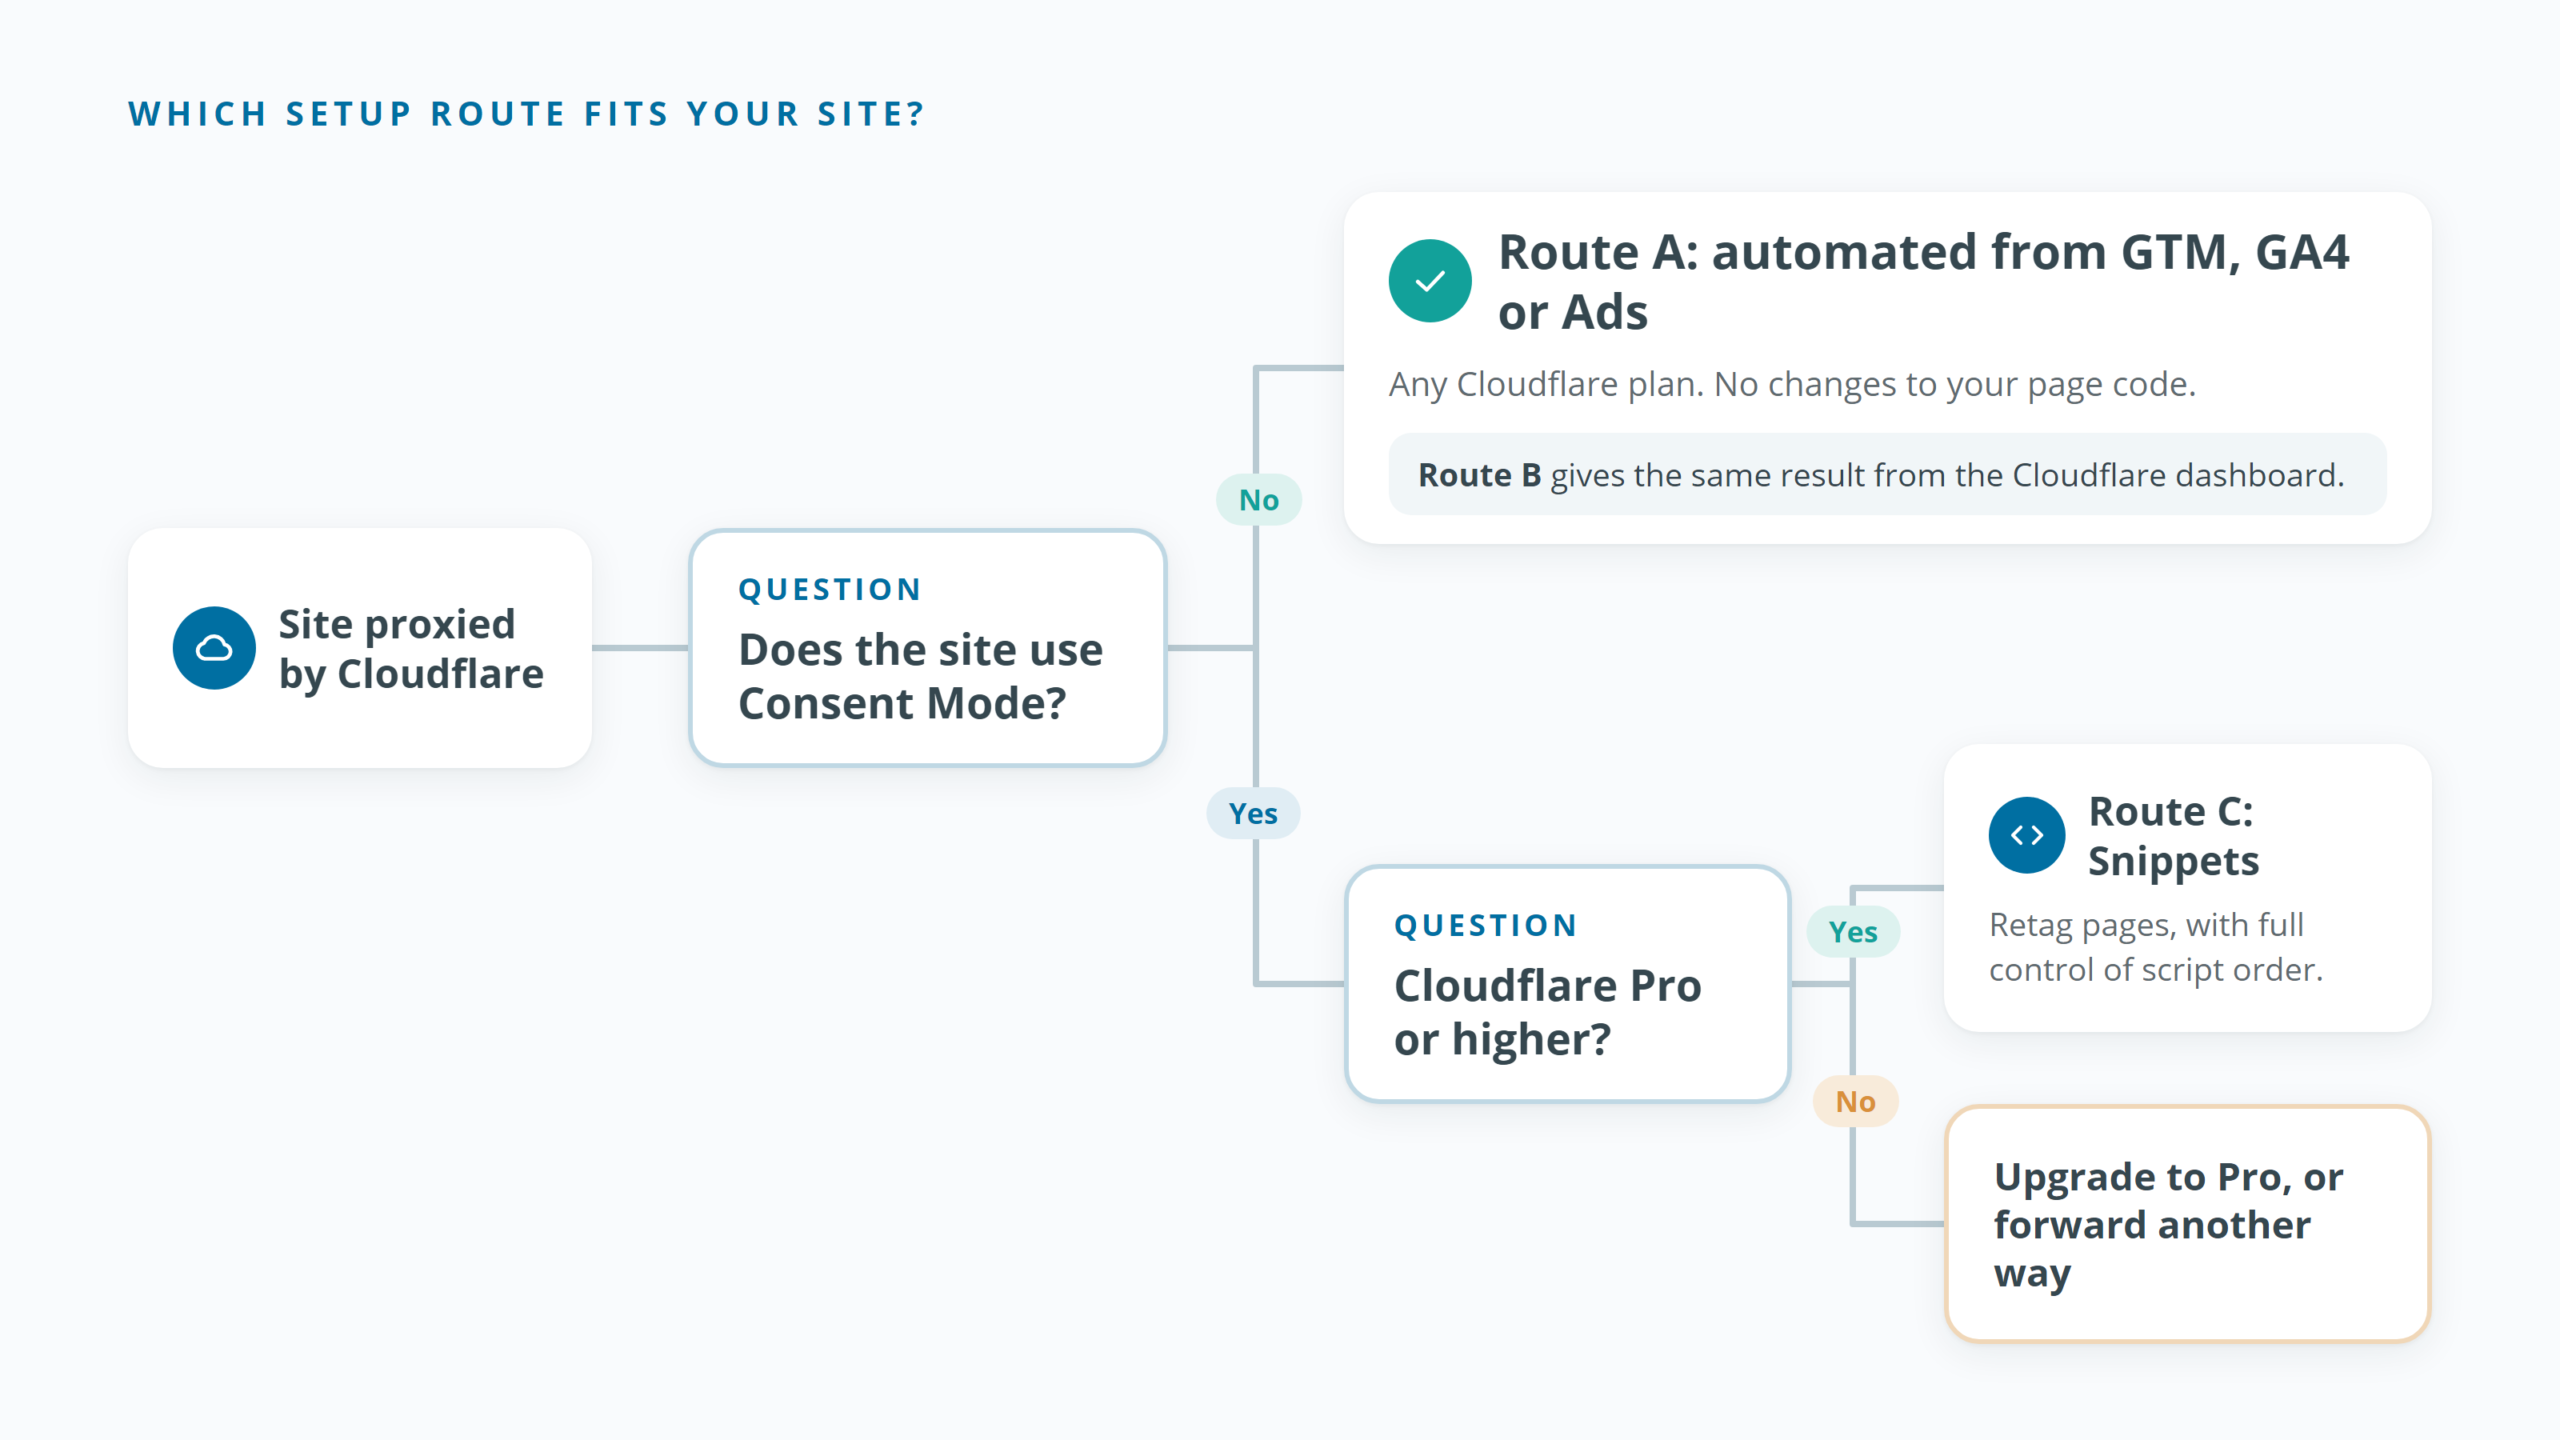
Our recommendation: Route A for most sites, and Route C whenever consent mode is in play. If you need Route C but are on Cloudflare’s Free plan, note that Cloudflare Snippets are officially supported only on Pro and higher. Either upgrade the zone, or use another forwarding method your team can maintain (Google’s self-service guide covers other CDNs and load balancers).
Route A: one-click setup from Google Tag Manager
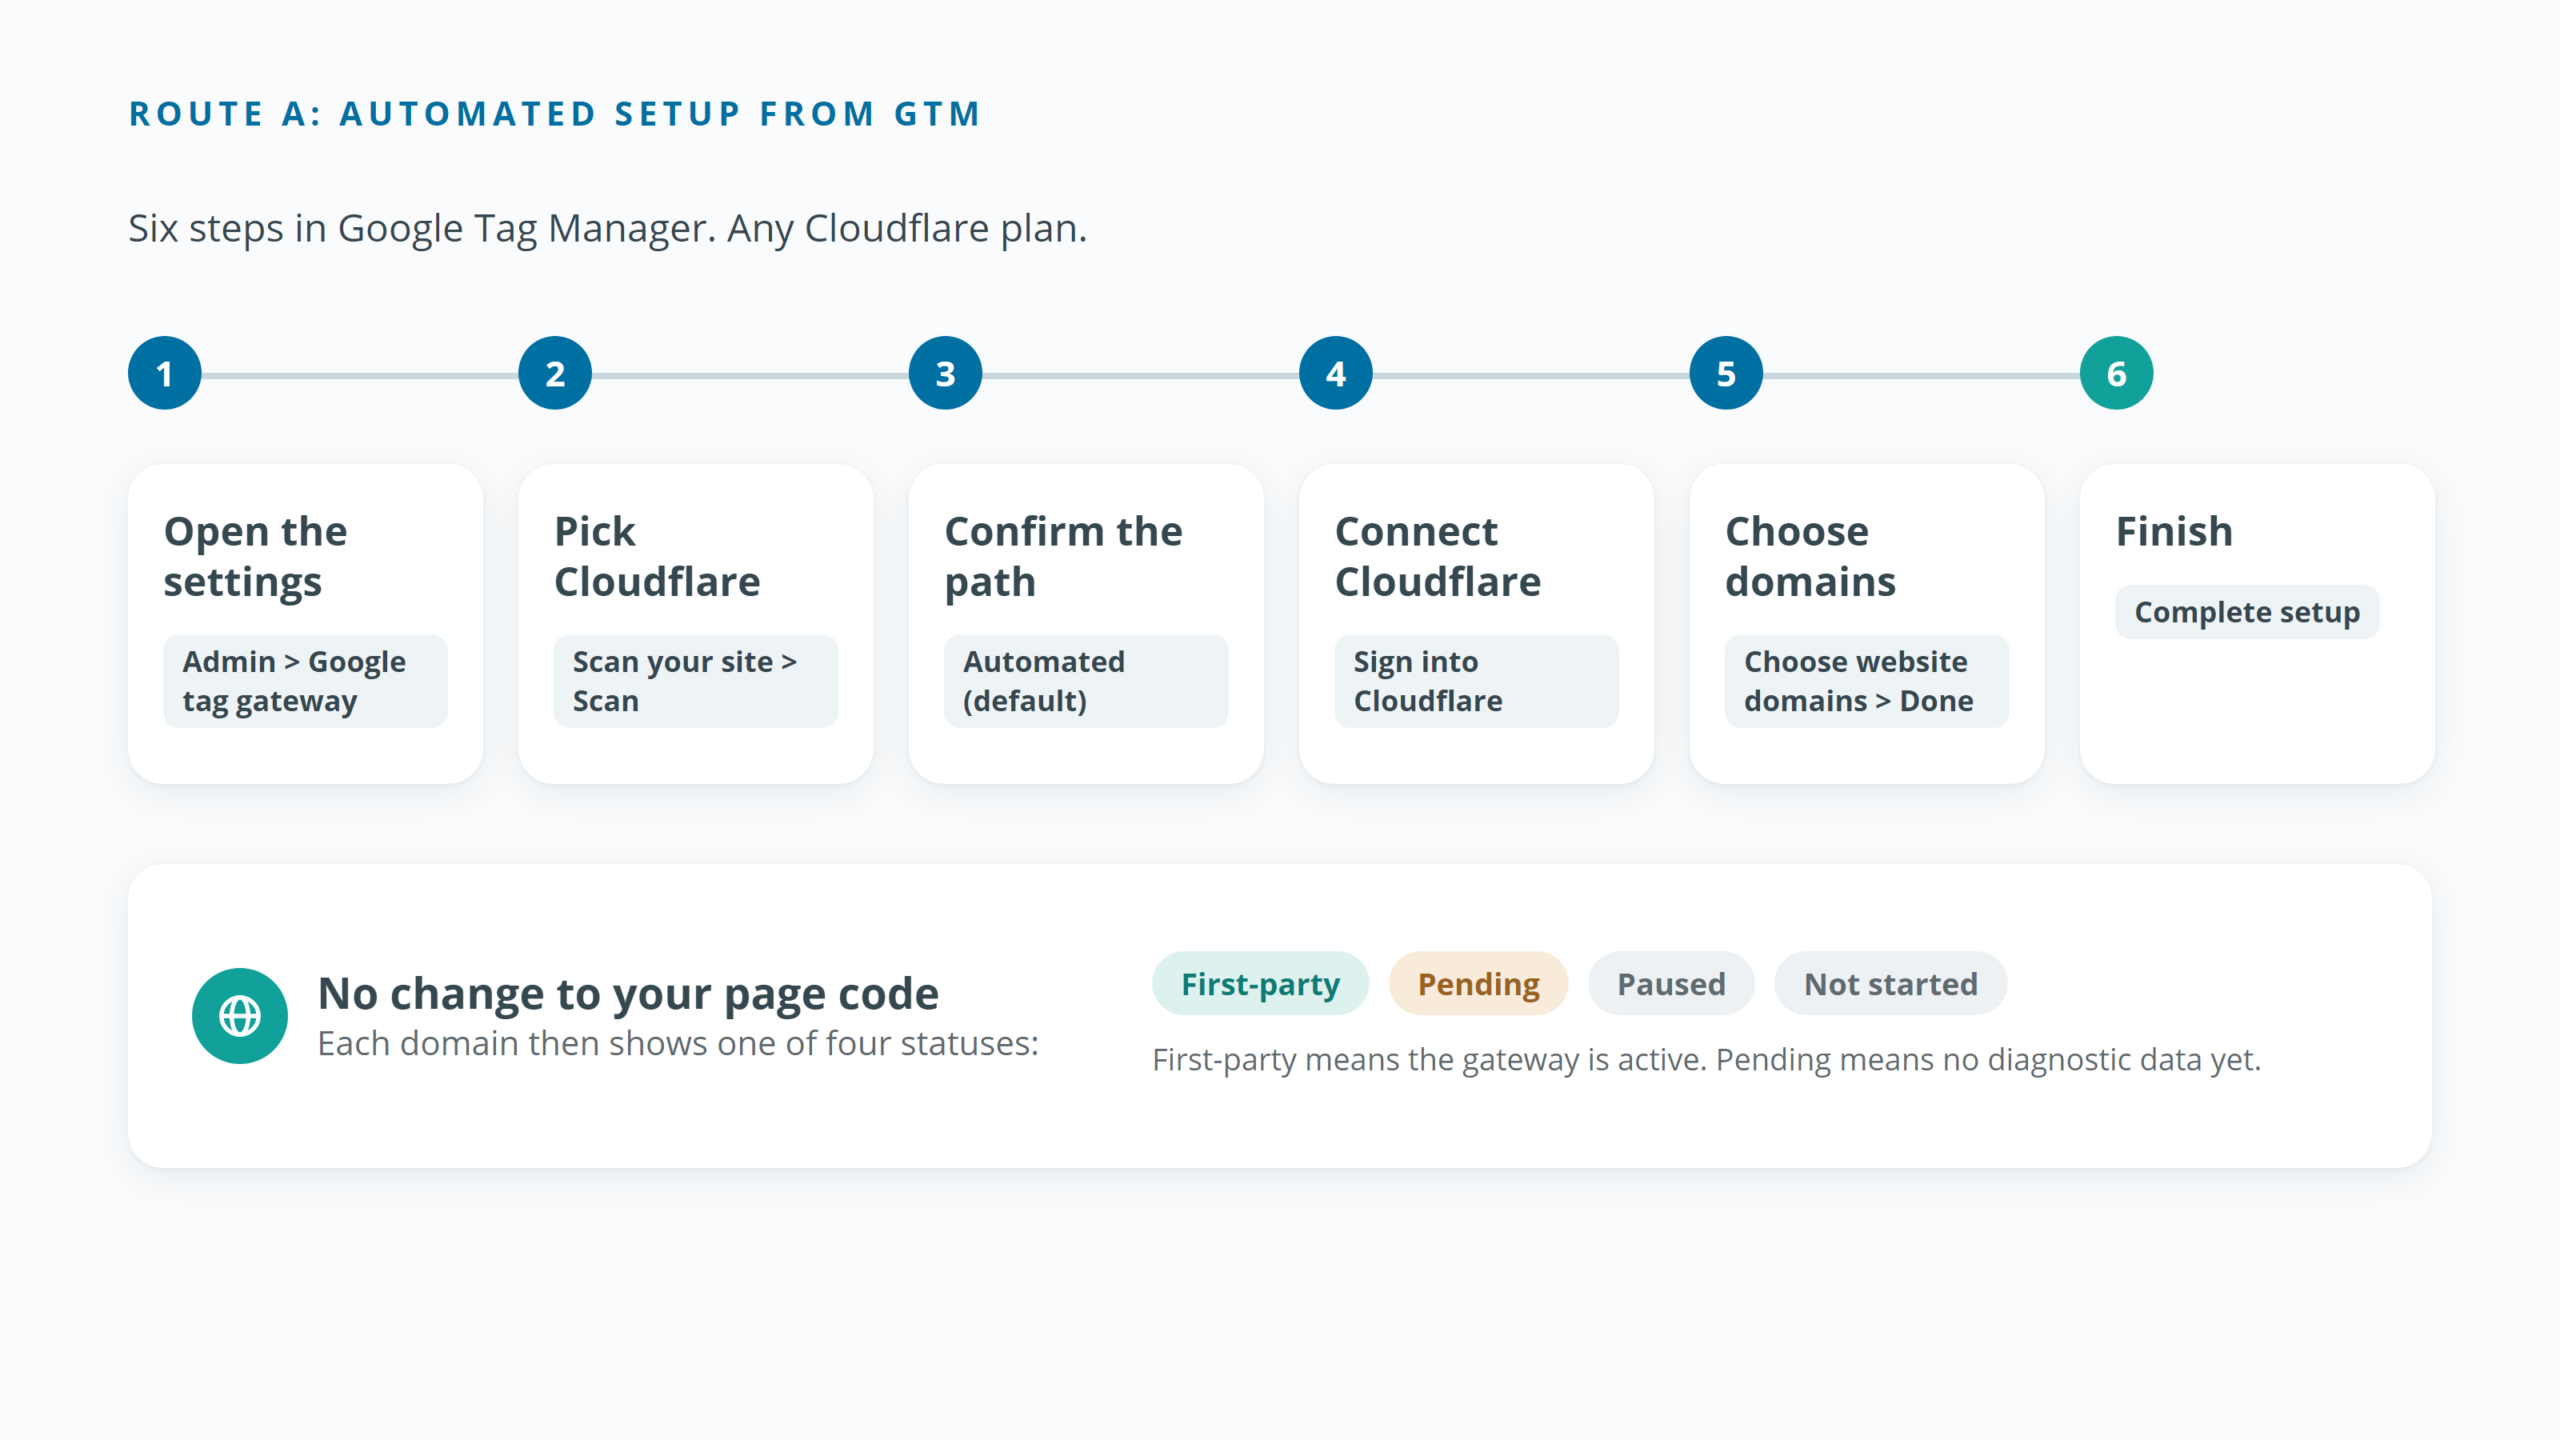
Step 1. Open the gateway settings. In GTM, open your container, go to Admin and select Google tag gateway. If you manage a standalone Google tag elsewhere, the same screen is in two other places:
- GA4: Admin > Data streams > your web stream > Configure tag settings > Admin > Google tag gateway.
- Google Ads: Tools > Data manager > under “Google tag”, Manage > Admin > Google tag gateway.
Step 2. Pick Cloudflare. Select Continue, enter your site URL under “Scan your site” and select Scan. Confirm that Cloudflare appears in the results, then select Continue. Only detected platforms are shown by default. Show all platforms lists the rest.
Step 3. Confirm the measurement path. On “Set up and complete”, the Automated option is selected by default. Check the path Google proposes against your checklist. Change it if it collides with anything on your site.
Step 4. Connect Cloudflare. Select Sign into Cloudflare, sign in with an account that holds one of the roles above, and approve Google’s access. Google uses it to read your zones and create the routing for you.
Step 5. Choose your domains. Select Your website domains will be activated, tick the domains under “Choose website domains”, and select Done. Closing the panel without selecting Done discards your choice.
Step 6. Complete the setup. Select Complete setup. You return to the Google tag gateway screen, where each domain shows a status:
| Status | Meaning |
|---|---|
| First-party | The gateway is active |
| Pending | Enabled, but no diagnostic data has arrived yet |
| Not started | Not activated |
| Paused | The gateway is paused |
Your page code does not need to change on this route. On pages with no Google tag, the platform can insert one: Manage domains groups your domains into Tagged, Untagged and Other active domains. View Page Source on a live page shows what is actually being served. Now go to the checks.
Route B: start from the Cloudflare dashboard
- In the Cloudflare dashboard, go to Tag Management > Google Tag Gateway.
- Select your domain.
- Switch on Turn on and configure Google tag gateway.
- Enter your Google tag ID (the container ID
GTM-XXXXXXX, or aG-/AW-ID for a standalone tag) and your measurement path. - Select Save.
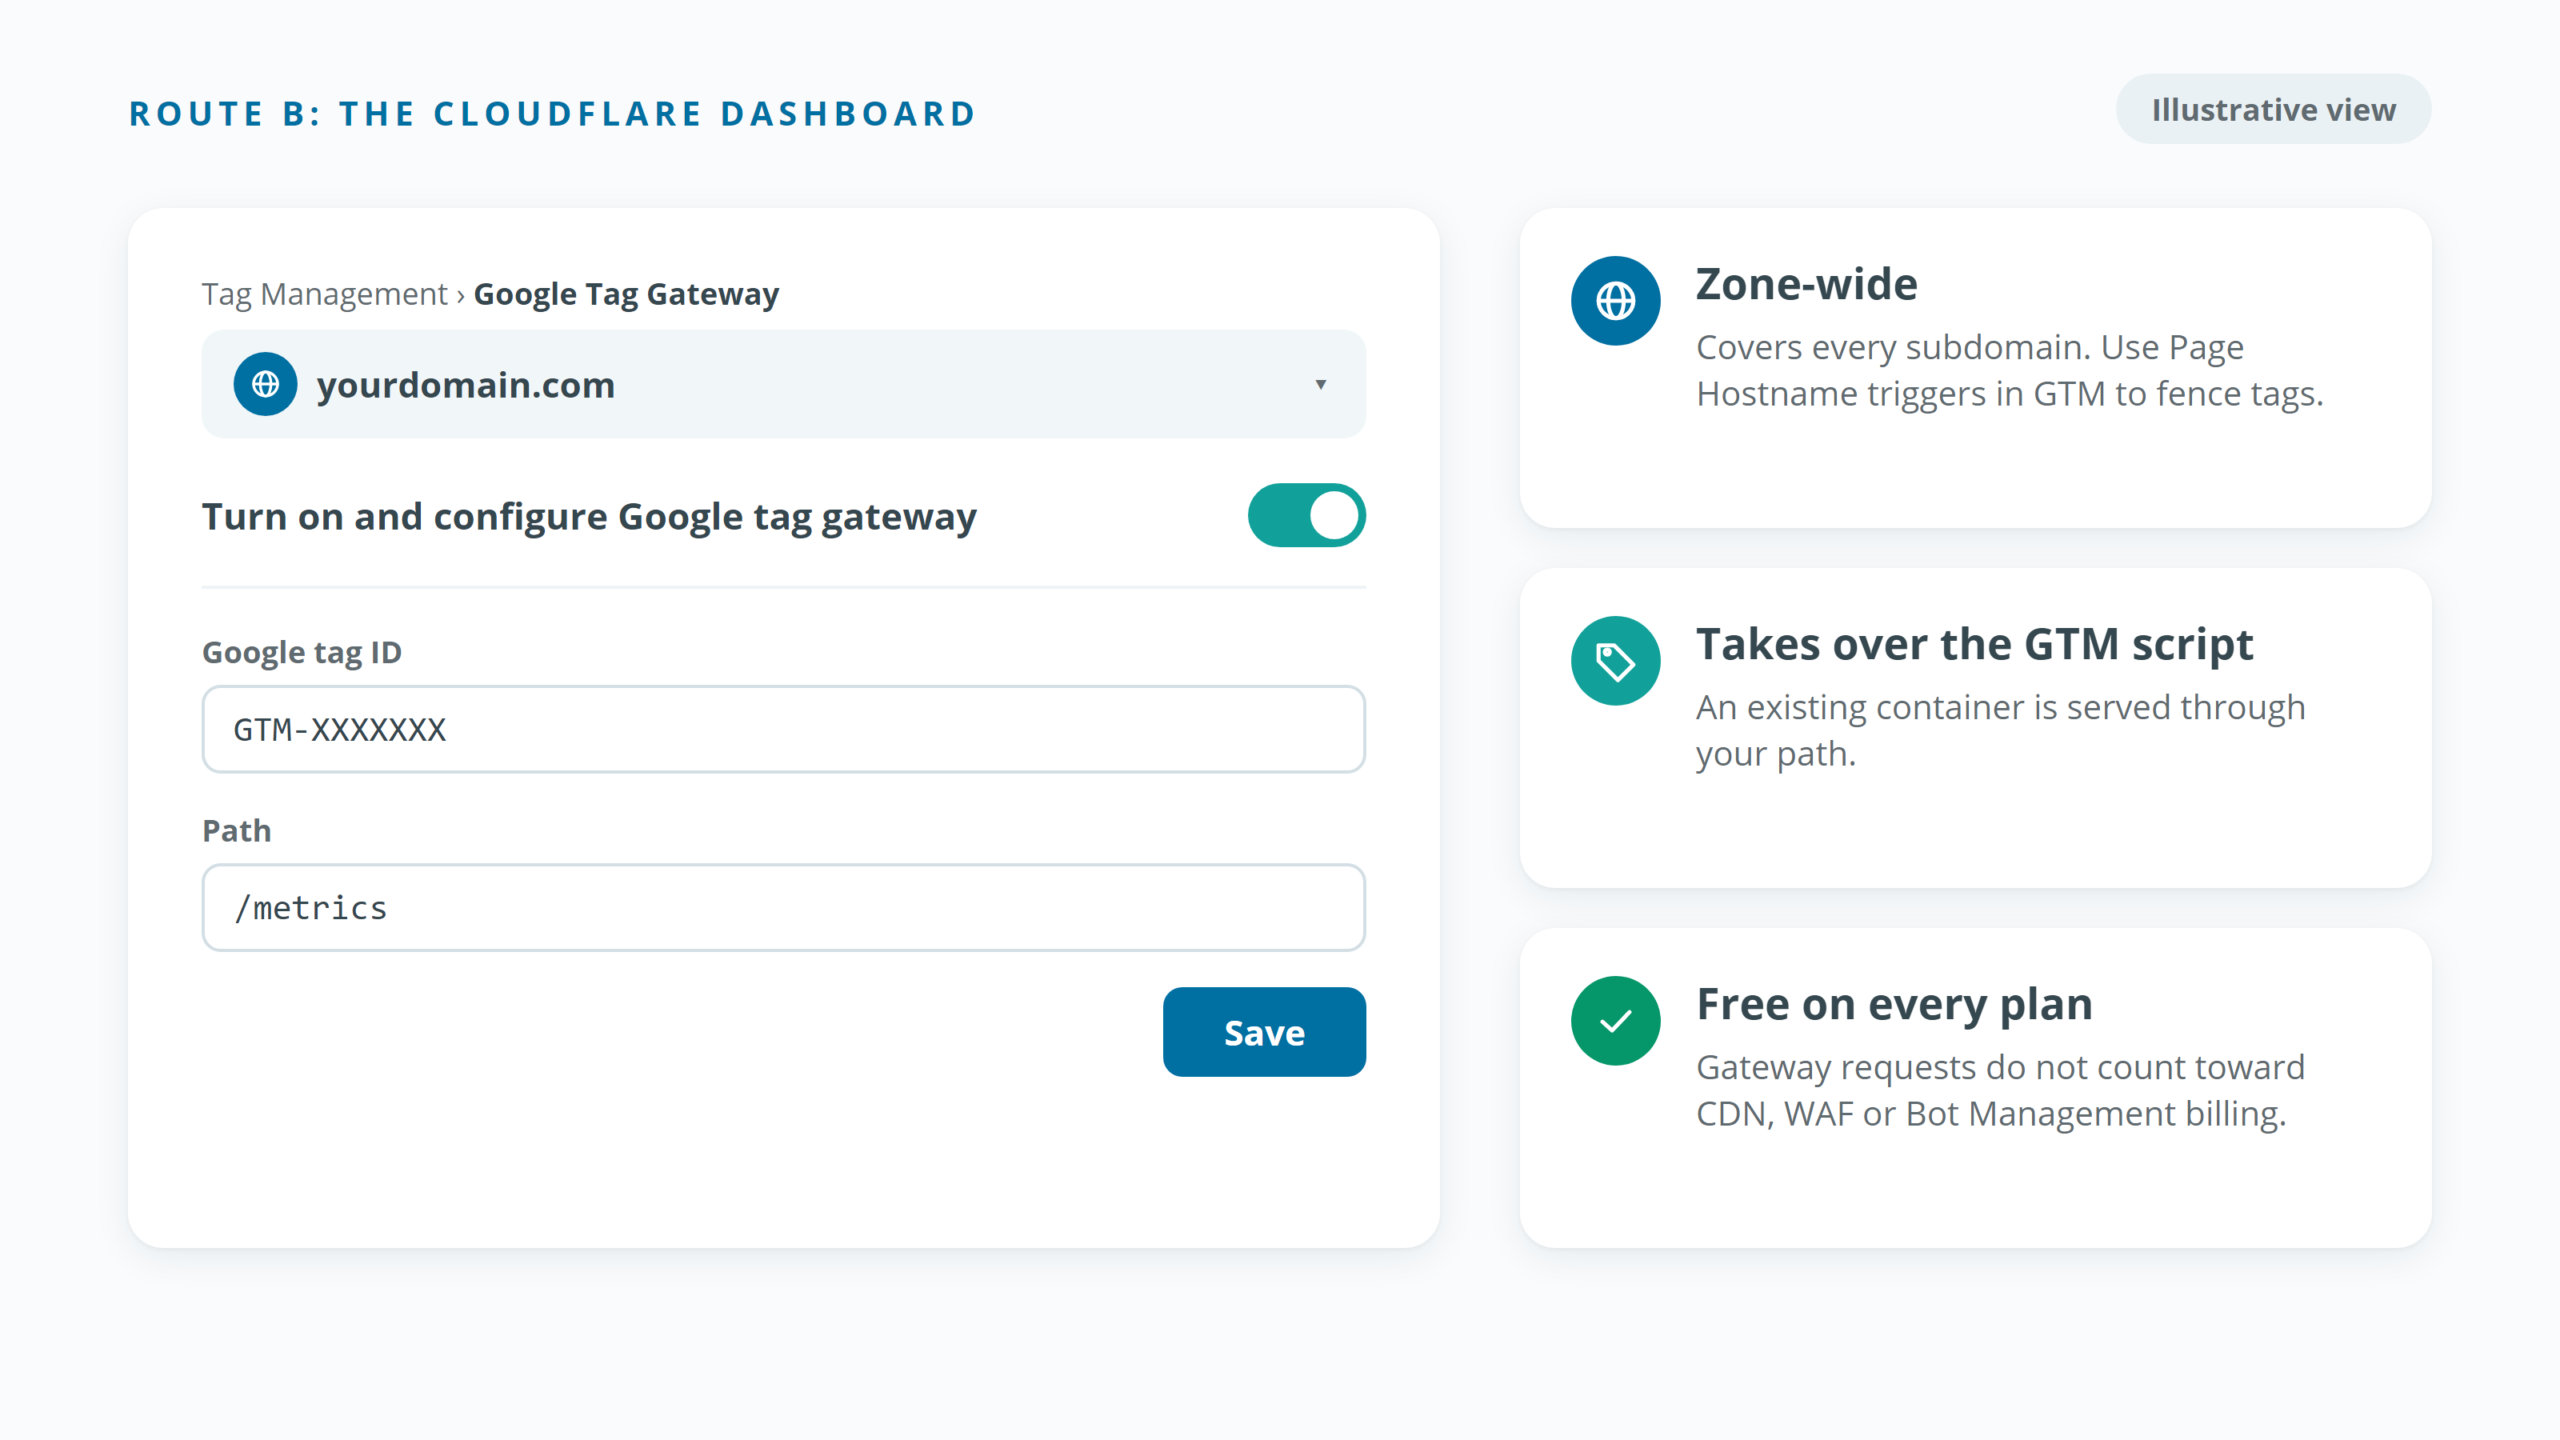
Cloudflare’s documentation notes that if a Tag Manager script is already on your site, the first-party tag overrides it. Once saved, the Google tag gateway screen in GTM should show the domain as Active. Then go to the checks.
Route C: manual setup with Cloudflare Snippets (for consent-mode sites)
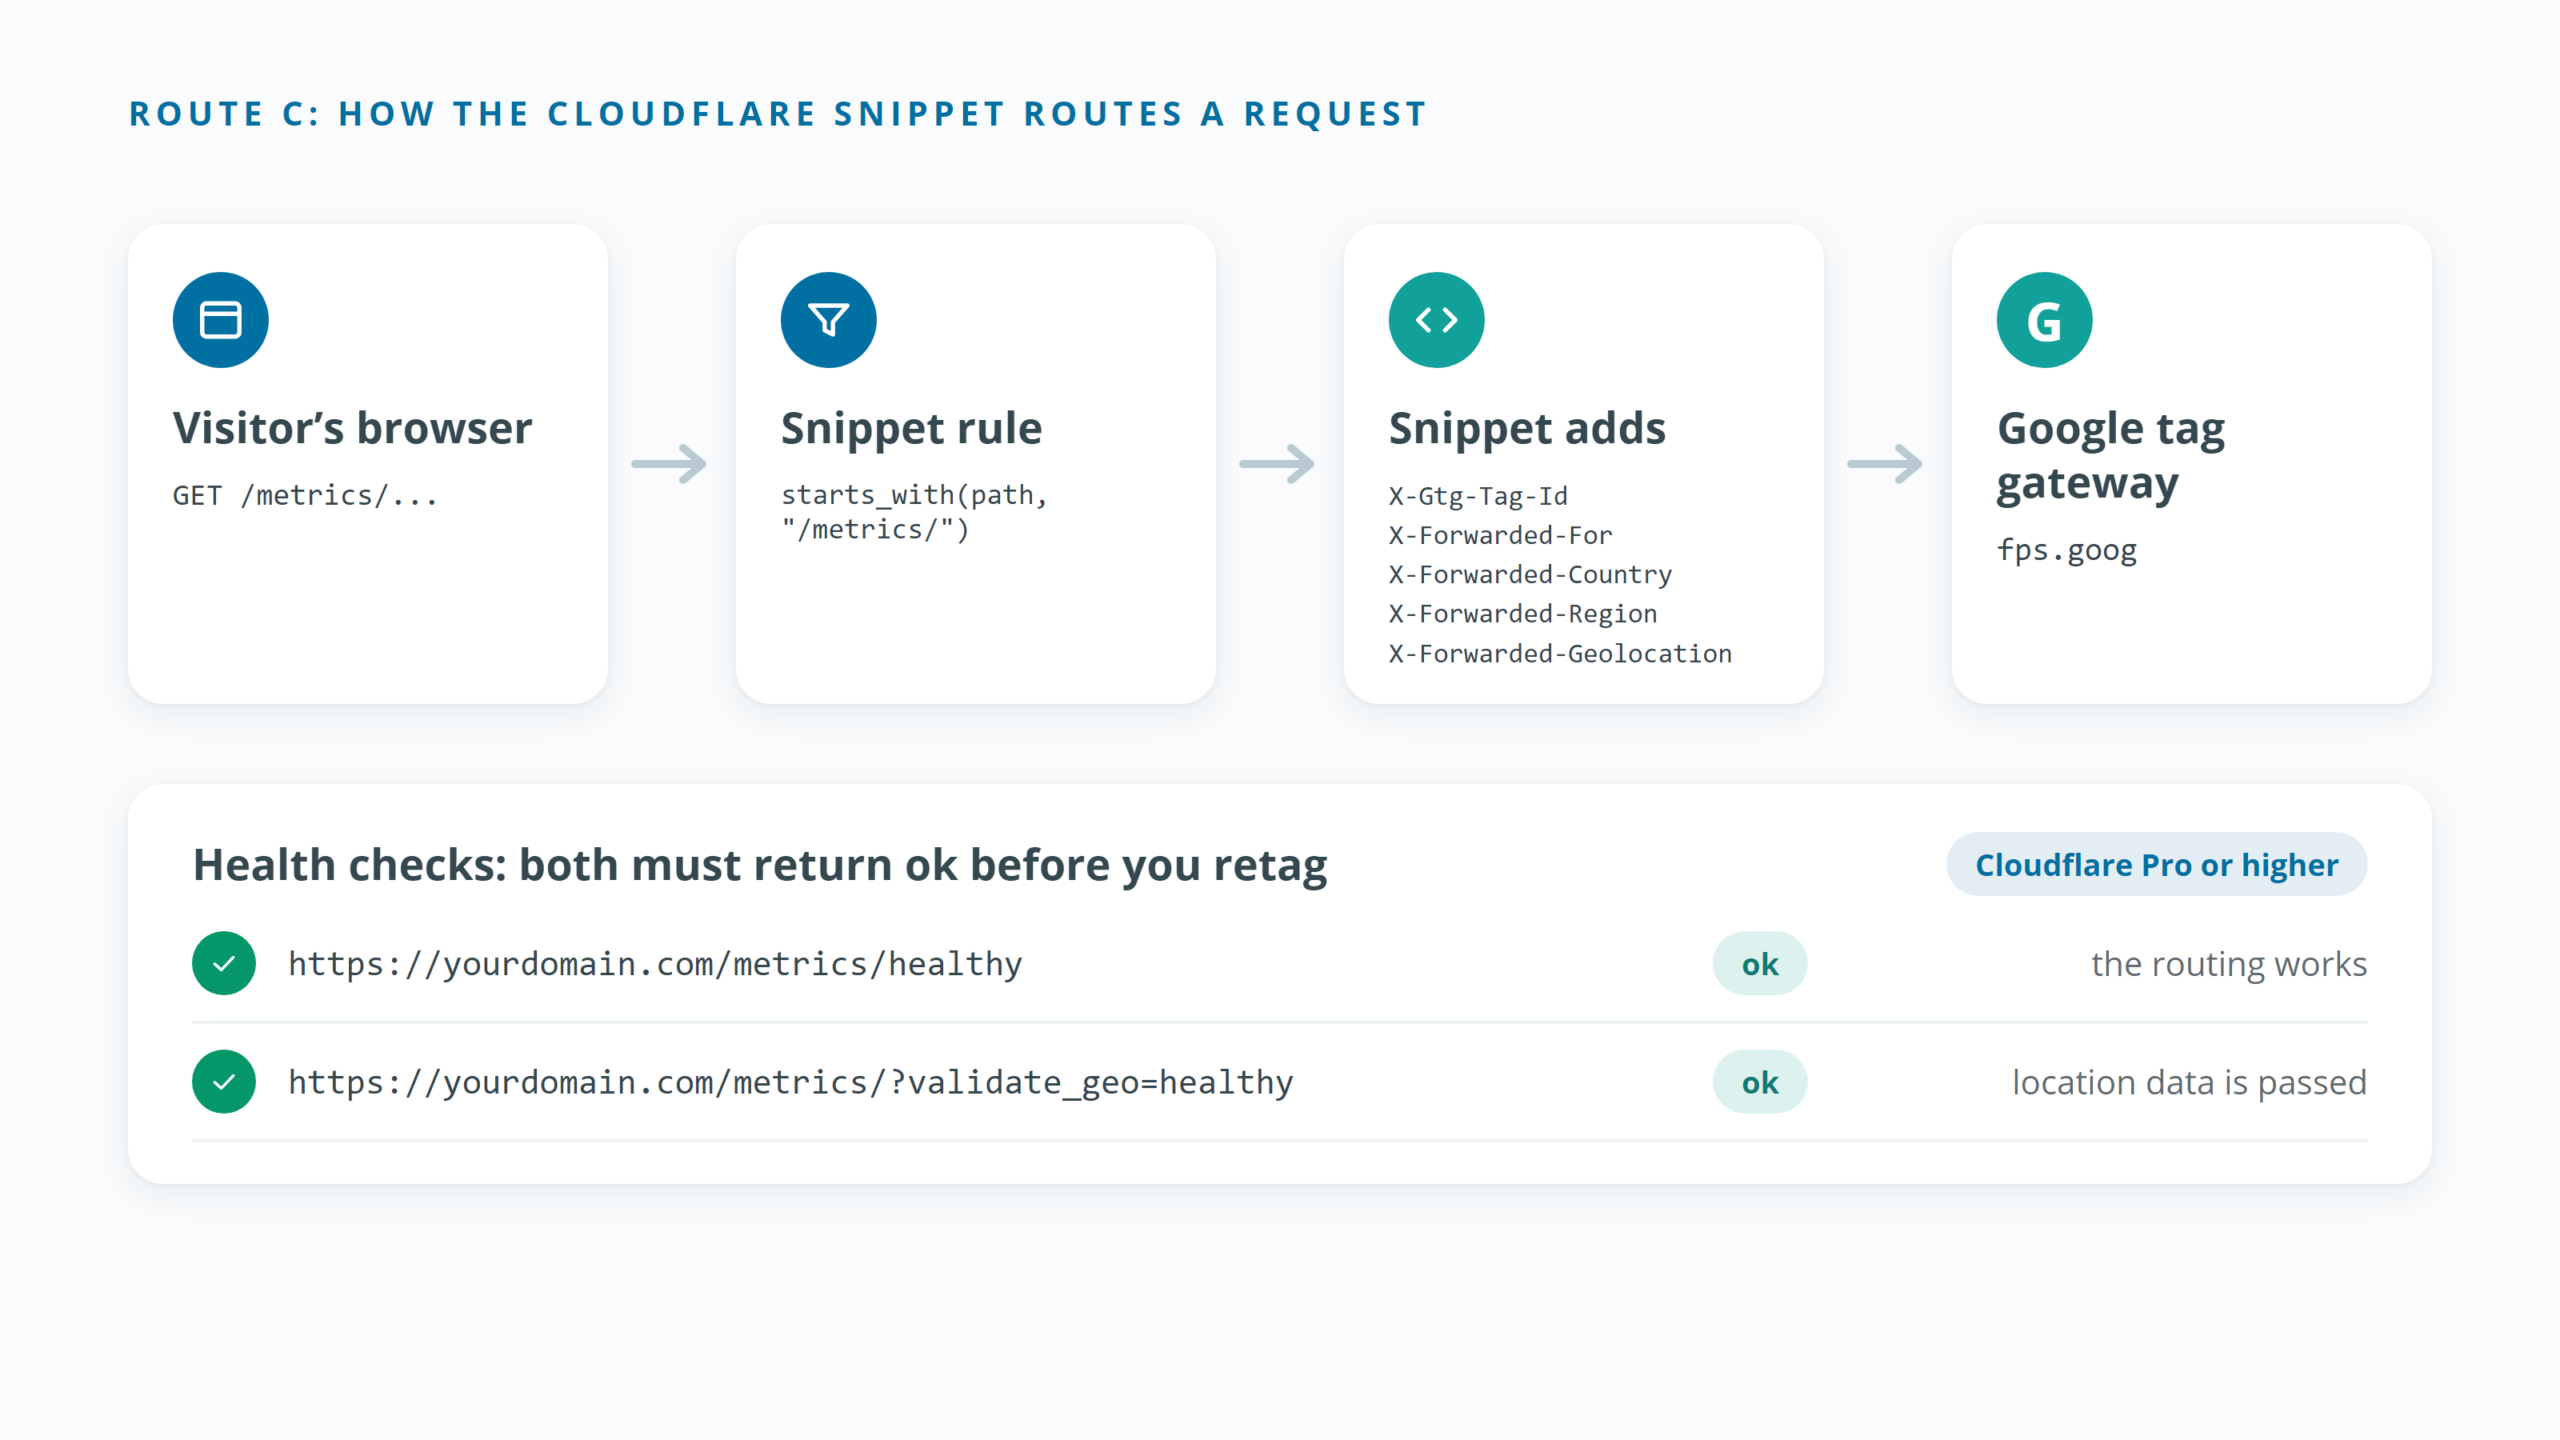
This route has three parts: route the traffic, check it is healthy, then retag your pages. You can start inside Google’s flow (on “Set up and complete”, open More ways to set up and choose Guided). On Pro and higher, Open extension lets Tag Assistant walk you through the same snippet and run the health checks for you. The steps below do it directly in Cloudflare.
Part 1: create the Snippet
- In Cloudflare, go to Account Home > your domain > Rules > Snippets and select Create Snippet.
- Name it after your tag ID, using only lowercase letters, numbers and underscores. Hyphens become underscores, for example
google_tag_gateway_gtm_abc1234. - Paste this code from Google’s setup guide, replacing
GTM-XXXXXXXwith your container or tag ID:
The code sends the request to Google’s gateway, tells Google which tag it belongs to, and passes on the visitor’s IP plus the country, region, city and coordinates that Cloudflare already knows. Leave the geolocation lines as they are. Without them, your location reports degrade.
- Select Snippet rule, choose Custom filter expression, then Edit expression, and paste the following (use your own path and keep the trailing slash):
- Select Done, then Deploy.
Part 2: run the health checks
Open both URLs in a browser. Each should return the text ok:
https://yourdomain.com/metrics/healthyconfirms the routing works.https://yourdomain.com/metrics/?validate_geo=healthyconfirms location data is being passed.
Do not retag until both pass.
Part 3: retag every page
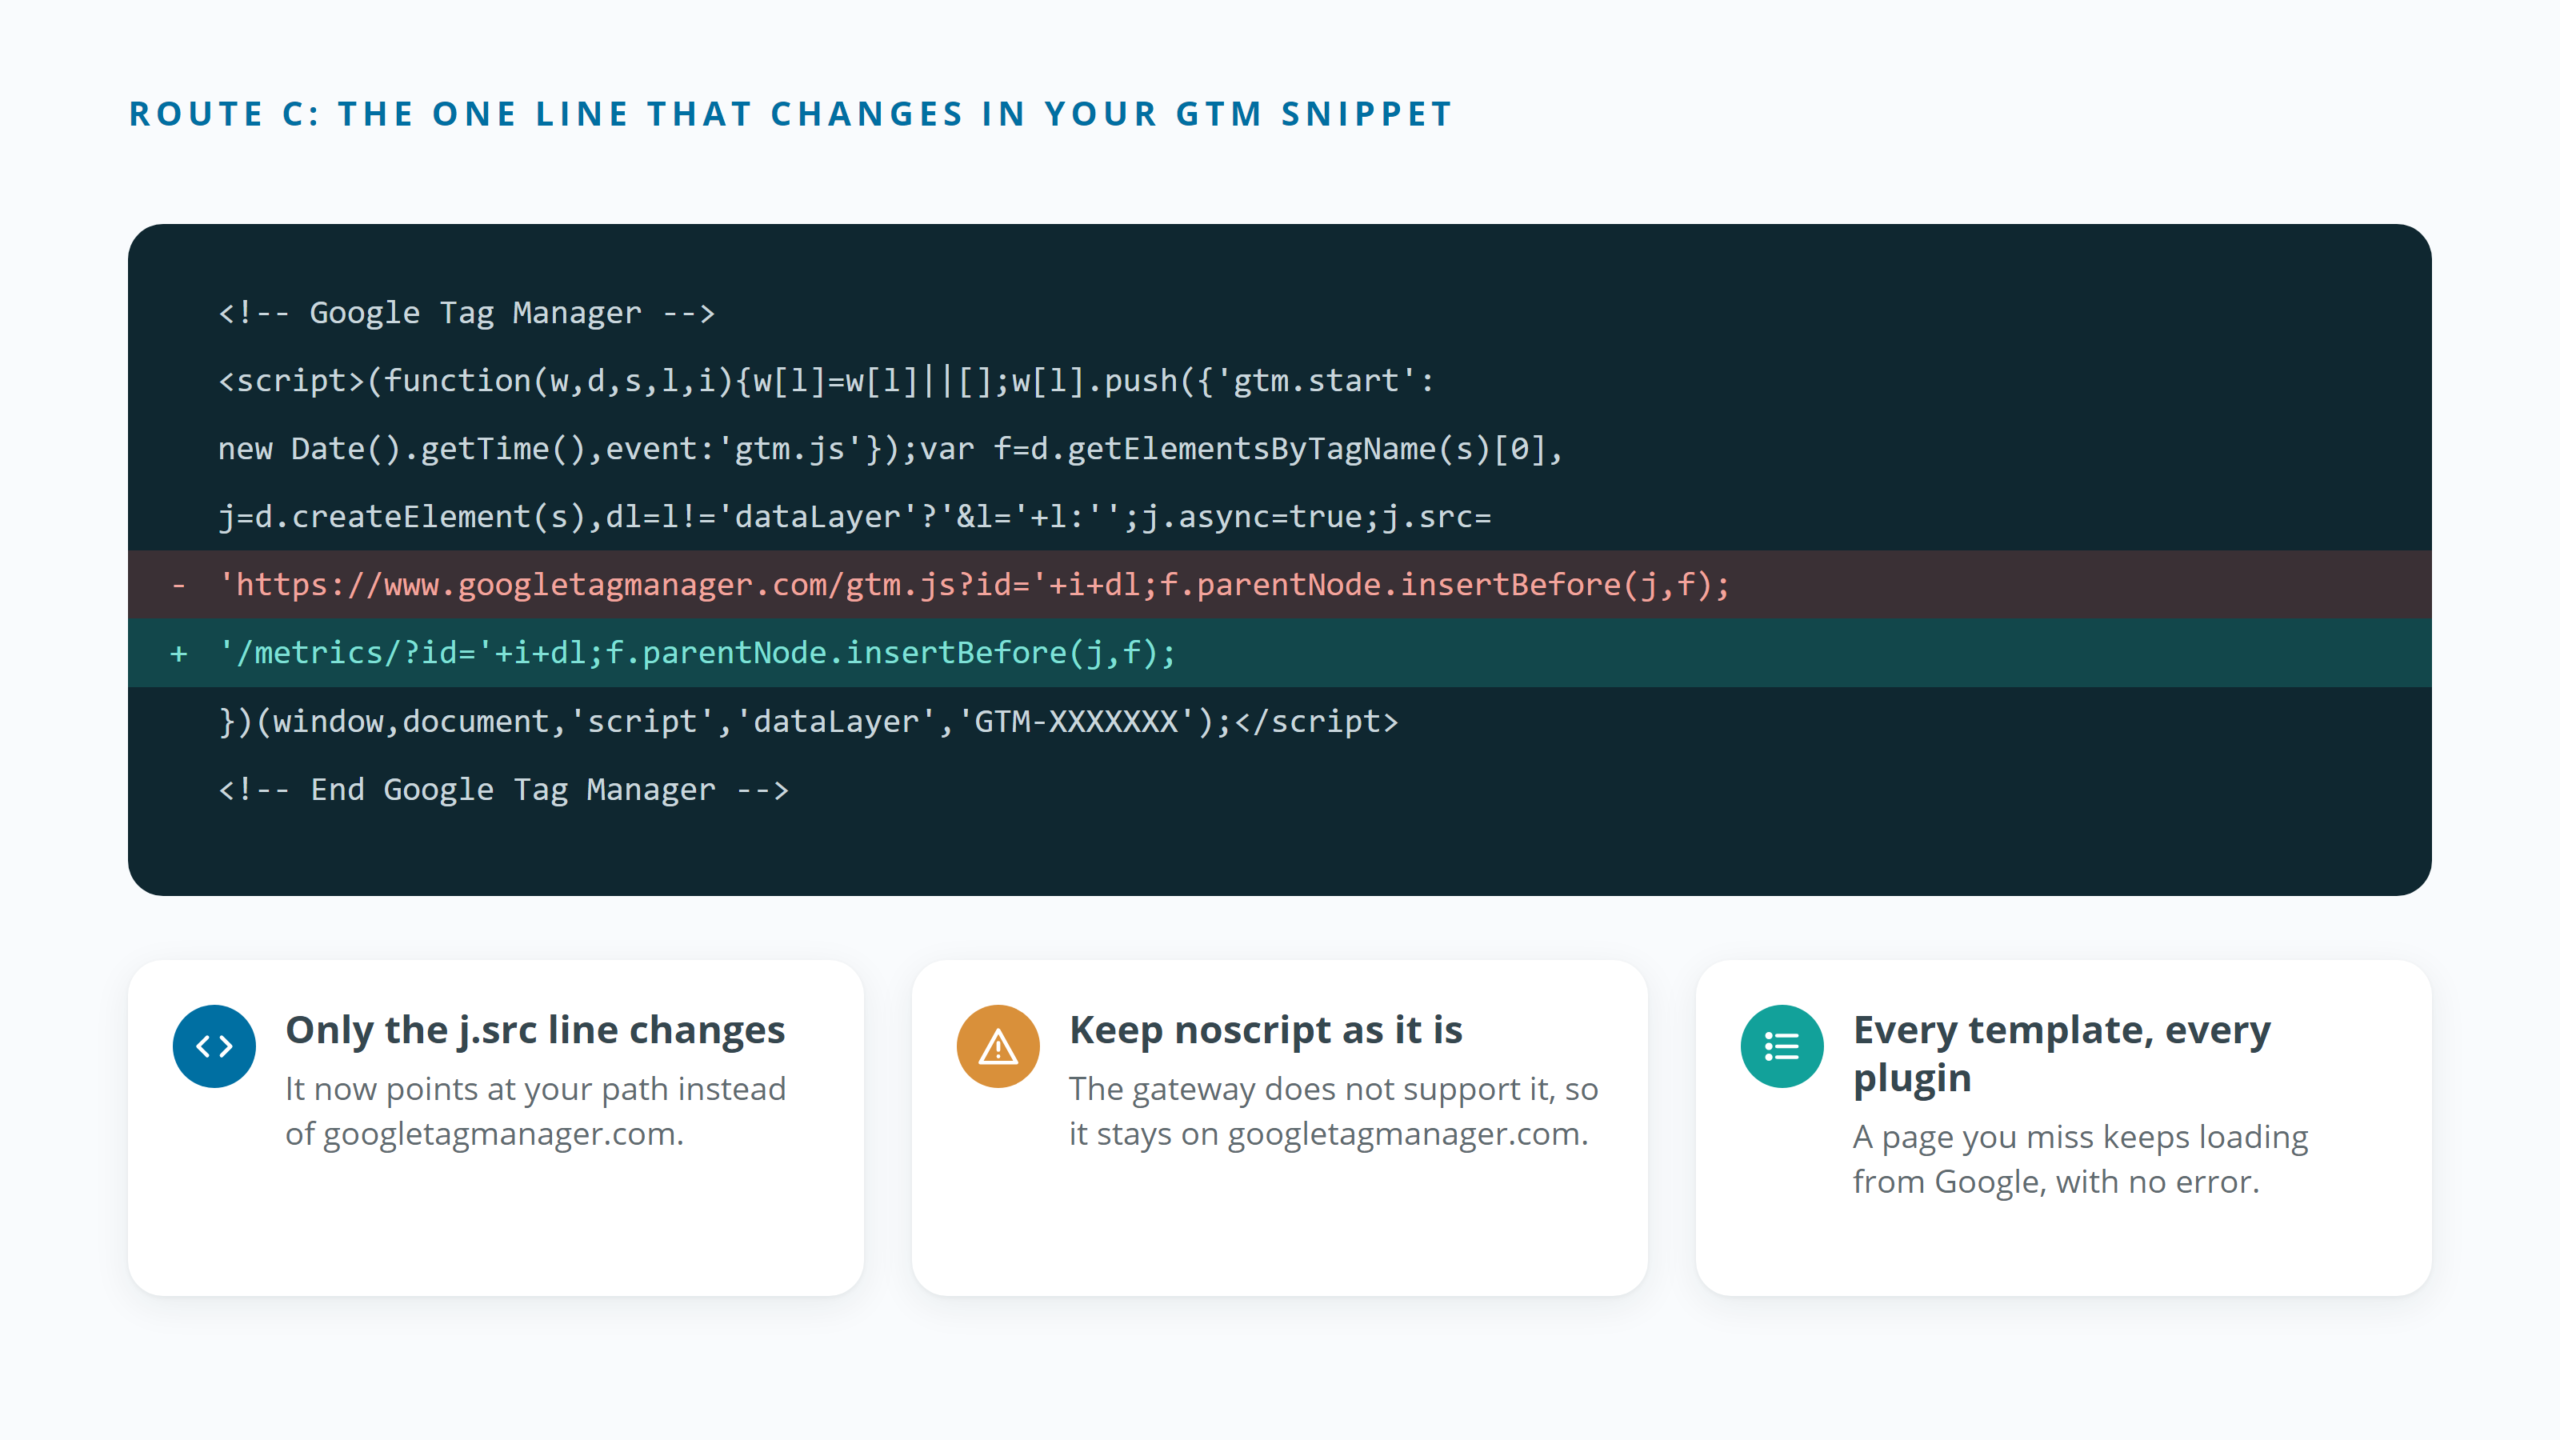
If you use GTM, replace the Tag Manager snippet at the top of the page’s head section with this version. The only change from the standard snippet is the j.src line, which now points at your path instead of https://www.googletagmanager.com/gtm.js?id=:
Keep the noscript iframe that follows the opening body tag exactly as it is, pointing at www.googletagmanager.com. The gateway does not support the noscript snippet.
If you use gtag.js directly, replace the loader line:
with the measurement path, as Google’s guide shows it:
Your inline gtag('config', ...) lines stay unchanged.
Keep consent first. This route exists so you control the order. Consent defaults must be set before any Google tag loads, including the one on your gateway path:
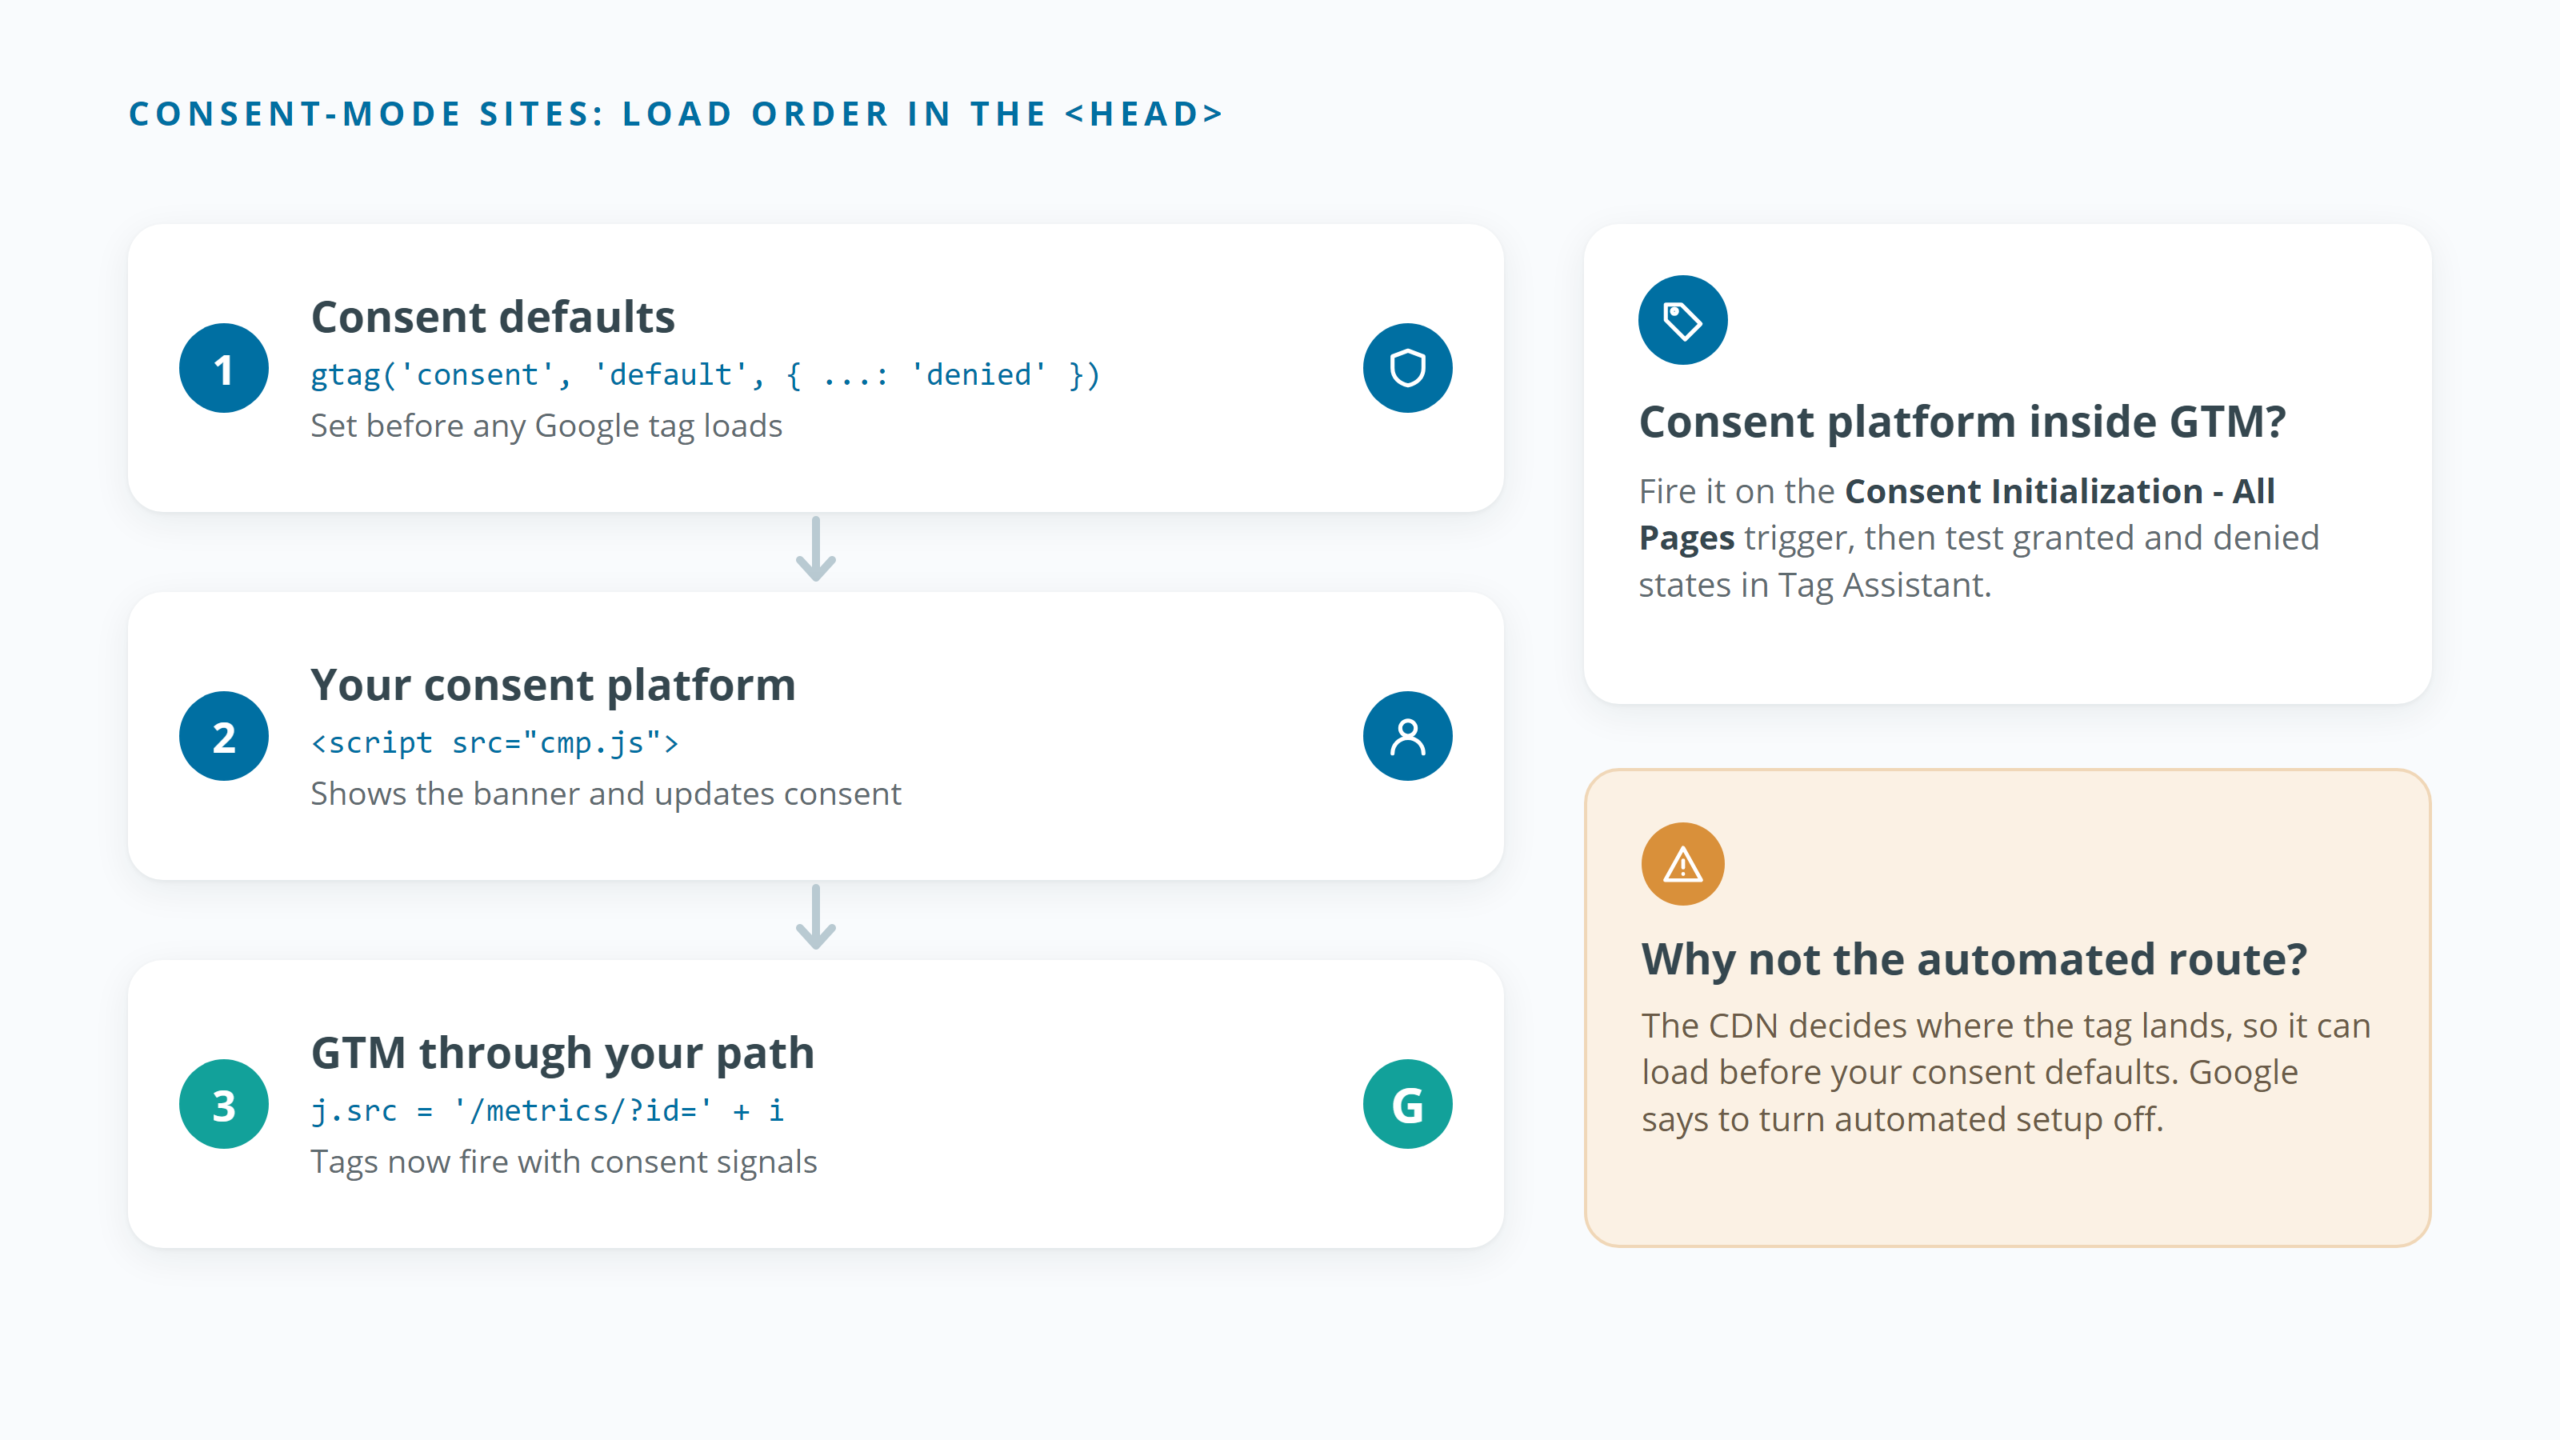
If your consent platform runs as a GTM template, it sets the defaults inside the container instead (see the GTM section below).
Watch for silent failures. Miss one page template, or leave a plugin inserting the old snippet, and those pages keep loading tags straight from Google with no error at all. Check every template that carries the snippet, and if a plugin or theme setting inserts your container, make the change there.
What changes inside Google Tag Manager?
- No tag changes for the gateway itself. One setup on the container covers every tag already inside it, so tags, triggers and variables stay as they are. Publish only if you change something from this list.
- Set it up once, on the container. Separate containers and standalone tags each need their own path.
- Load the container once. If Cloudflare inserts the container while your theme or a plugin also hardcodes it, you will count pageviews twice. Page source and Tag Assistant should show a single container.
- Fire consent first. If your consent platform runs as a GTM template, make sure it fires on the Consent Initialization – All Pages trigger so defaults are set before any other tag. Test both the granted and denied states in Tag Assistant, and treat any warning that a tag fired before the consent default was set as a blocker.
- Fence off subdomains. The gateway applies to the whole Cloudflare zone, including every subdomain and custom hostname, and cannot be switched off per subdomain. To keep tags off a staging or admin hostname, add a Page Hostname condition to the relevant triggers, which is the workaround Cloudflare recommends.
- Keep noscript as it is, pointing at
www.googletagmanager.com. - If you run server-side GTM, plan before stacking. A server container with its own custom loading domain already does much of what the gateway does. Google’s recommended pairing of gateway plus server-side tagging has its own setup guide. Do not run two loaders side by side without a plan; our server-side GTM and CAPI service covers that assessment.
How do you check that it works?
Make sure at least one tag in the container fires on page load before you start, because Tag Assistant needs a hit to show you.
| Check | How | Pass |
|---|---|---|
| 1. Health endpoints (Route C) | Open /your-path/healthy and /your-path/?validate_geo=healthy |
Both return ok |
| 2. Script source | DevTools > Network, reload, filter by your path | The container loads from yourdomain.com/your-path/?id=GTM-..., not googletagmanager.com/gtm.js |
| 3. Hits | Tag Assistant: connect to your site, browse, open Summary > Output > Hits Sent | Hits are routed to /your-path |
| 4. Status | GTM: Admin > Google tag gateway | Active, shown as First-party, for every domain |
| 5. Geography | GA4 Realtime now, then the country and city reports over the next few days | No jump in “(not set)” locations |
| 6. Effect | Compare two to four weeks after go-live with your baseline | Recovered sessions and conversions, by browser and country |
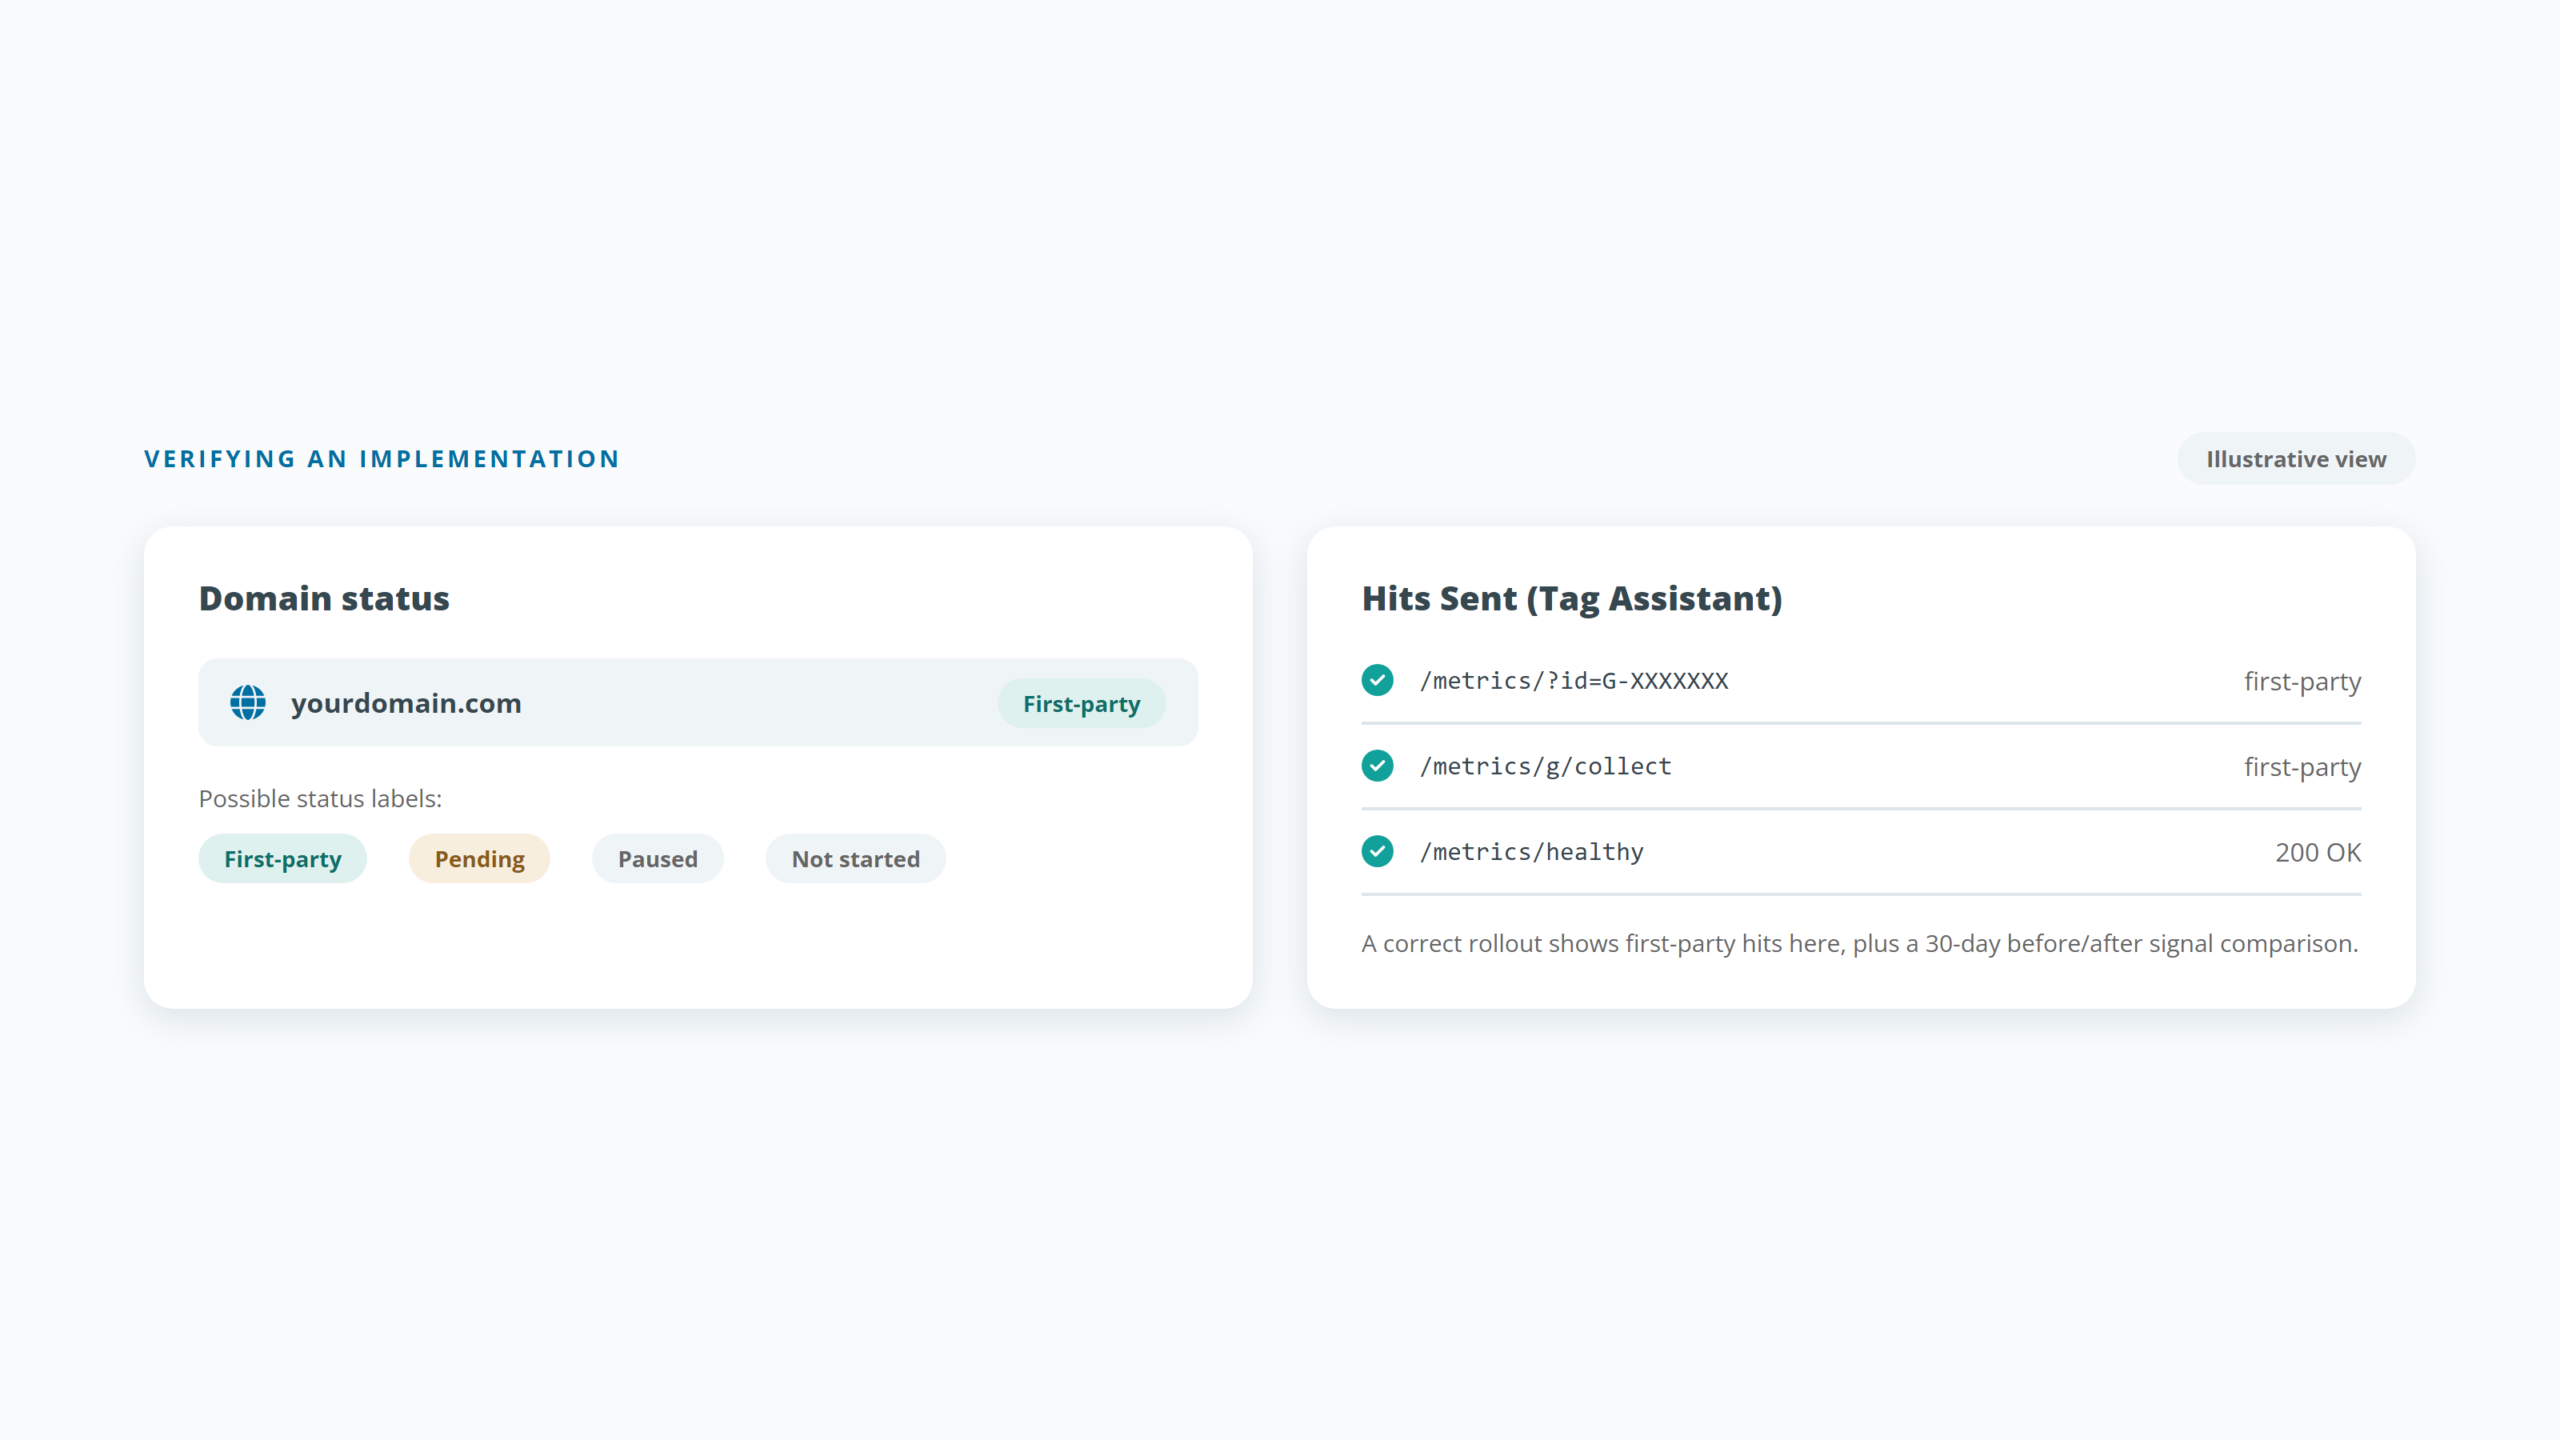
Some requests will still go to Google domains, and that is expected. Google describes the gateway as sending some measurement requests through your domain. Google documents that for visitors in the European Economic Area, GA4 data bypasses the gateway and goes to Google’s regional endpoints, while Google Ads hits still use it. Do not expect zero requests to Google in the Network tab.
Troubleshooting: common problems and fixes
| Symptom | Likely cause | Fix |
|---|---|---|
| Status stays on Pending | No diagnostic data has arrived yet | Browse the site with tags firing, then check again later |
| Container still loads from googletagmanager.com | Route C: a template or plugin was not retagged | Update every template and plugin that outputs the snippet |
/healthy does not return ok |
Rule expression does not match the path, the trailing slash is missing, or the snippet was not deployed | Correct the expression and select Deploy |
validate_geo fails, or “(not set)” locations rise |
Geolocation headers are not reaching Google | Restore Google’s snippet code unchanged |
| An existing page stopped working | The measurement path collides with a real path | Move to a new, unused path |
| Duplicate pageviews | The container loads twice | Remove the extra copy |
| Tag Assistant consent warning | A Google tag ran before the consent default | Put consent defaults first, using Route C |
| Errors at Complete setup | Connection or permission issue | Retry, then set up from the Cloudflare dashboard (Route B). If Cloudflare is not detected or incompatible, use Google’s self-service guide |
| Cloudflare not found by Scan | The site may not be proxied through Cloudflare | Proxy the records, or use Show all platforms |
How do you pause or remove the gateway?
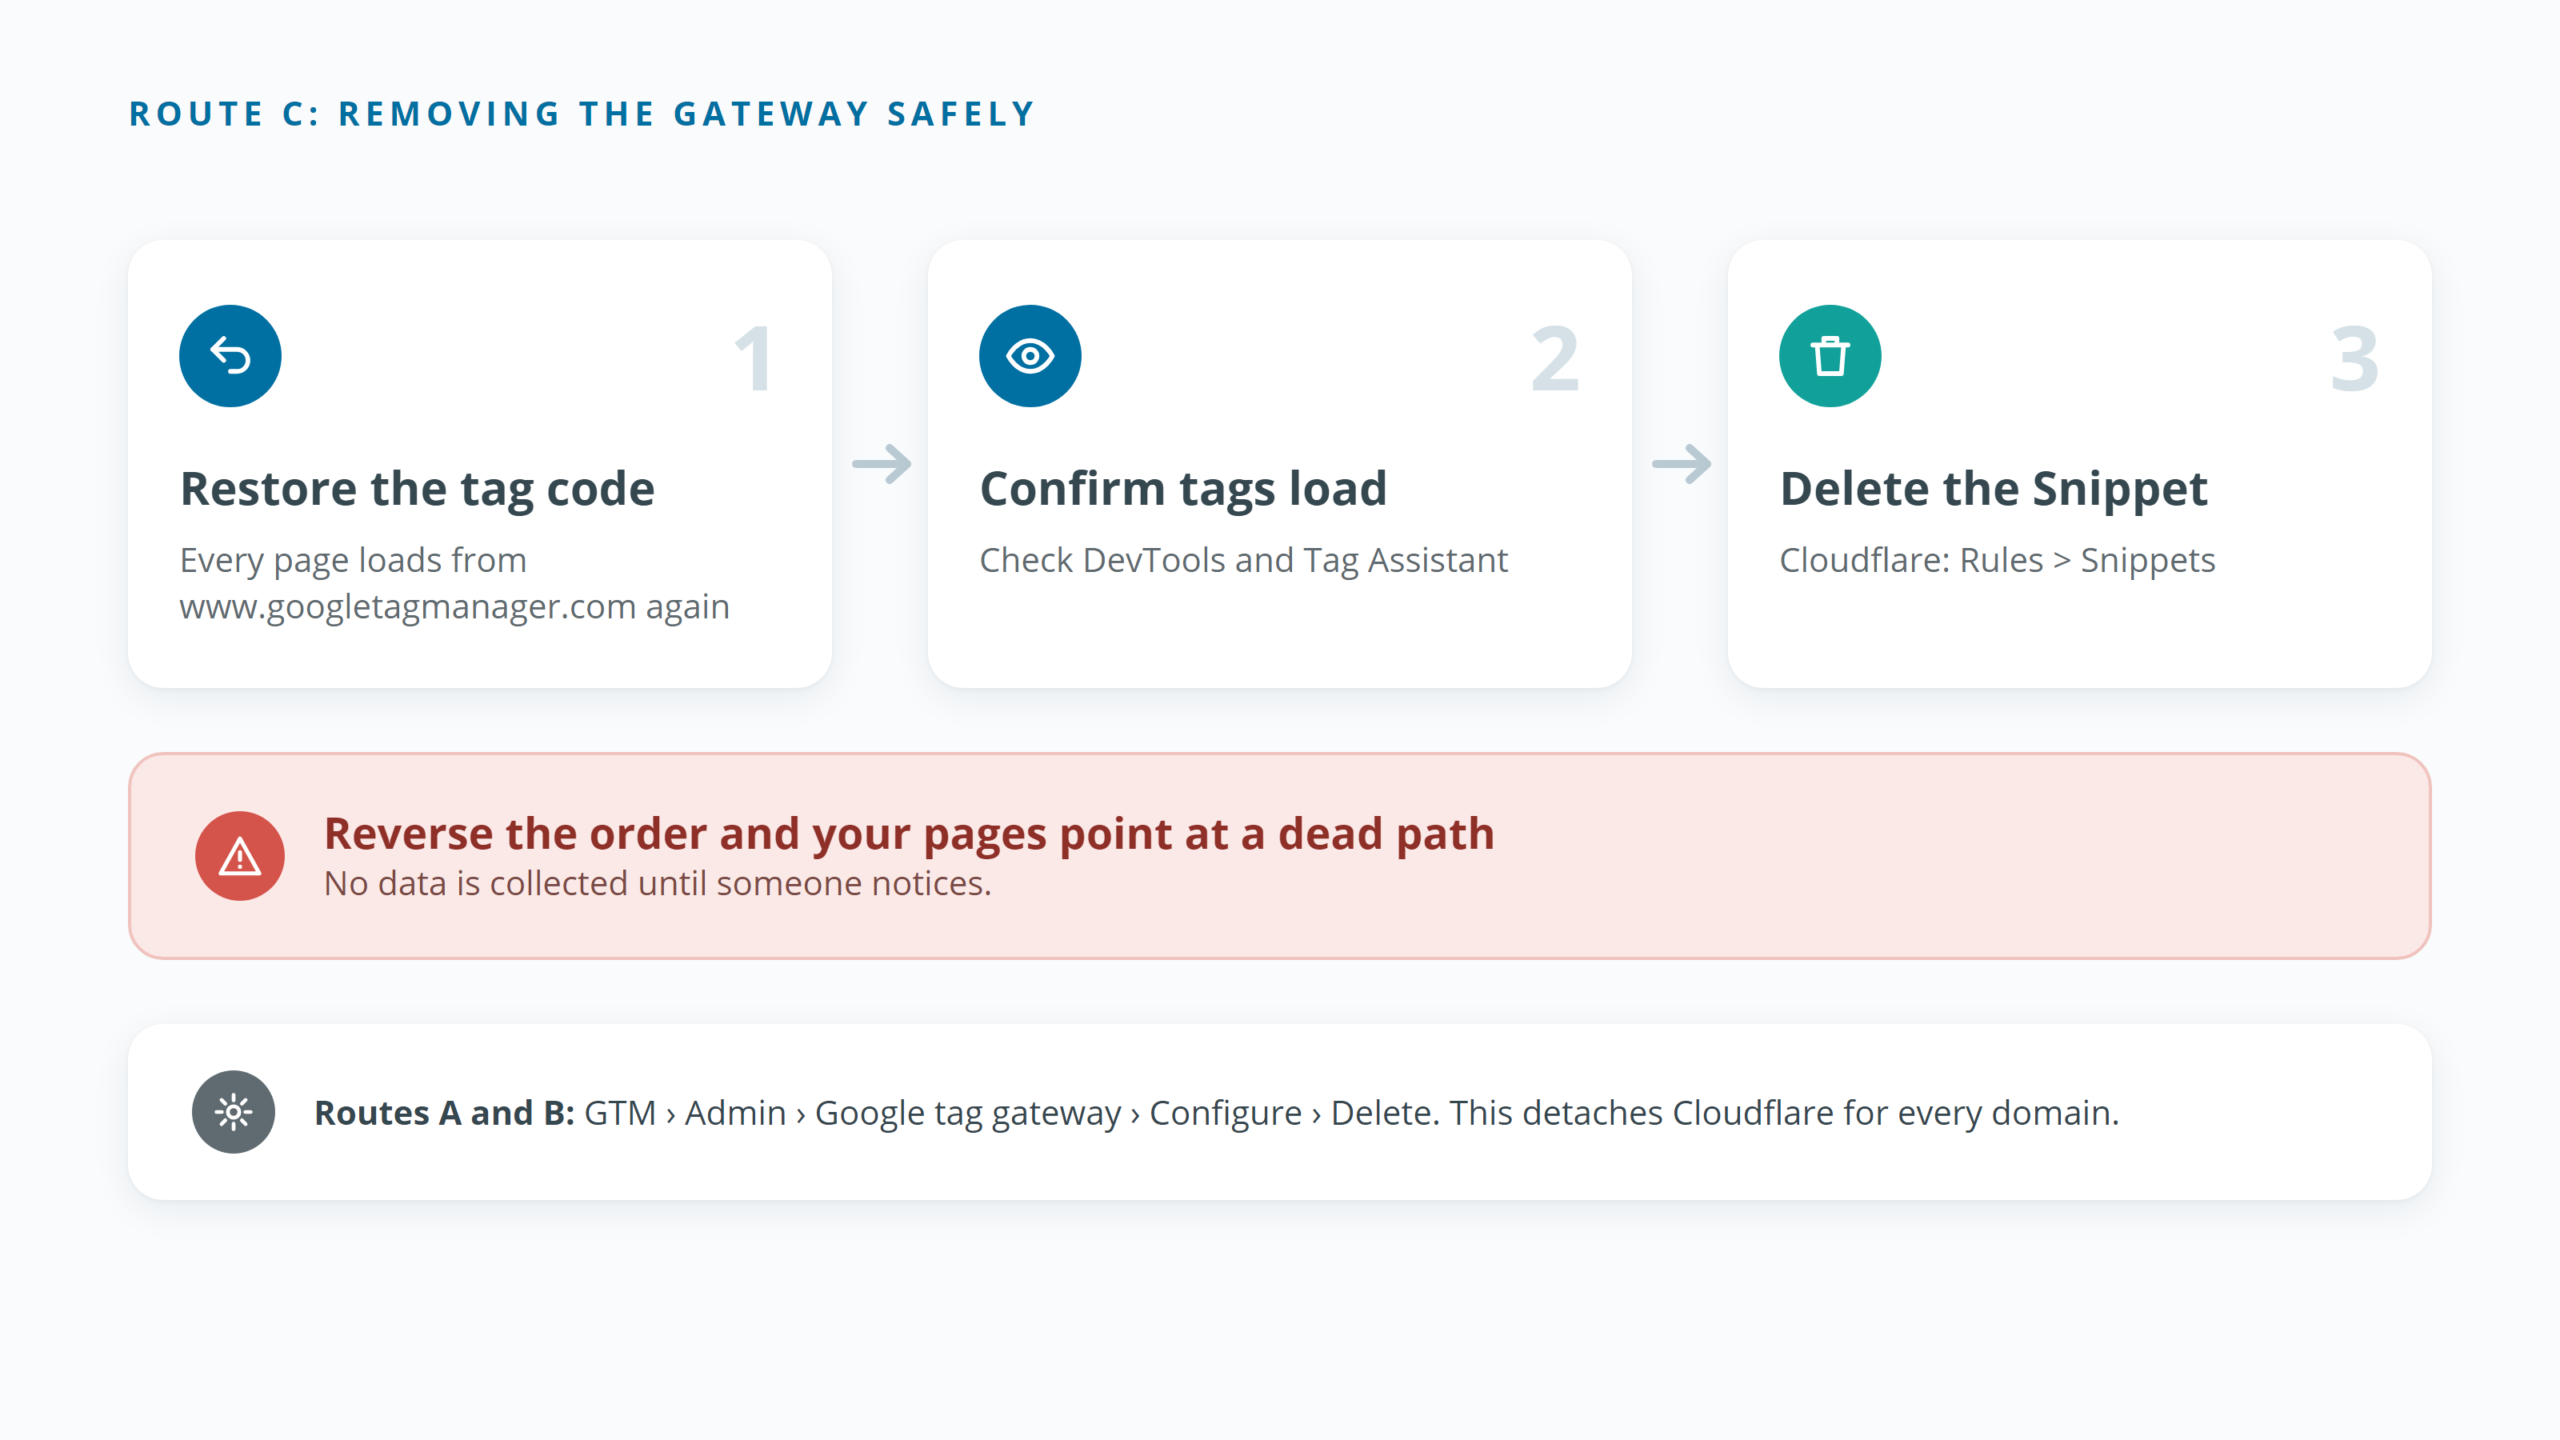
Routes A and B: in GTM, go to Admin > Google tag gateway, select Configure, then Delete. This detaches Cloudflare and disables the gateway for every active domain. You can set it up again later. Configure > Edit in Cloudflare is the route for changes short of removal.
Route C: order matters. First point every page’s snippet back to googletagmanager.com, then confirm tags load from Google, and only then delete the Snippet under Rules > Snippets. Do it the other way round and your pages point at a dead path, so you collect nothing until someone notices.
The bottom line
On Cloudflare, Tag Gateway takes a few minutes on the automated route and an afternoon on the manual one. The setup is the easy part. The value comes from choosing the right route for your consent setup, picking a path that collides with nothing, loading the container once, and checking the result against a baseline.
Daam Al-Arabia implements Google Tag Gateway for existing clients at no cost, including route selection, consent-safe configuration and a verified before/after measurement. If you would like us to handle it for your site, contact us or see our GTM management services.
Frequently asked questions
Do I need a paid Cloudflare plan for Google Tag Gateway?
Not for the automated routes. Cloudflare opened the integration to any plan, free, and gateway requests do not count toward CDN, WAF or Bot Management usage or billing. The manual route uses Cloudflare Snippets, which are officially supported on Pro and higher.
Do I need to change my GTM container for Google Tag Gateway?
Not for the gateway itself: one setup on the container covers the tags already inside it. You may still want to fix consent trigger order or add hostname conditions, as described above.
Does Google Tag Gateway work with Google Tag Manager?
Yes. Set it up once on the container ID (GTM-XXXXXXX) and every Google tag inside that container is covered, including GA4, Google Ads and Floodlight. Separate containers and standalone gtag.js tags each need their own setup and path.
Which measurement path should I choose?
Any path your site does not already use, other than the root /, up to 100 characters. A word such as /metrics is easy to read, and a random string of letters and numbers is less likely to clash. Confirm it returns your 404 page before you start.
Does Google Tag Gateway cover Meta, TikTok or Snap pixels?
No. Only Google tags go through the gateway. Every other pixel loads exactly as before.
How long until Google Tag Gateway shows as Active?
Google does not publish a time. A domain stays Pending until Google receives diagnostic data, so browse the site with tags firing to speed it up.
Can I turn on Google Tag Gateway for one subdomain only?
No. On Cloudflare the gateway applies to the whole zone. Use Page Hostname conditions in GTM triggers to control where tags fire.
Does Google Tag Gateway get past ad blockers?
Not reliably. Most blockers match request patterns rather than domains, and independent testing found they still recognize gateway traffic.
I already run server-side GTM. Do I need Google Tag Gateway?
If your server container already loads GTM from your own domain, the gateway adds little. Our explainer covers how the two fit together.
Sources
- Google for Developers: Set up Google tag gateway for advertisers
- Google Tag Manager Help: Google tag gateway for advertisers with Cloudflare
- Google Analytics Help: Google tag gateway in Google Tag Manager with Cloudflare
- Google Analytics Help: how gateway measurement works for EEA traffic
- Cloudflare Docs: Google tag gateway
- Cloudflare Blog: Google tag gateway for advertisers (8 May 2025)
Send Us A Message
Quick Contact
Quick Contact
Trusted by some of the biggest companies in the Kingdom